Showing posts with label pie. Show all posts

Wednesday, March 14, 2012

Bumbleberry Pie . . . for Pi Day 2012!


I don't know about you, but I always seem to miss Pi Day (03/14!). In the almost three years since I started this blog, I have never remembered to make a pie for the big day! Maybe it's because I'm no good at math? That's one theory. I had no real trouble until seventh grade, when geometry reared its ugly head. It was just too abstract for my liking, I guess, and things went down hill from there.


No wonder I took cover in books (pun intended) and eventually became an English major, who worked--predictably--in a college bookstore. Then I dabbled as a high school English teacher until I realized that wasn't where my heart lay, and then spent almost twenty years working in editorial departments for a publishing company. So, no math for me. Well, at least not the real scary kind.


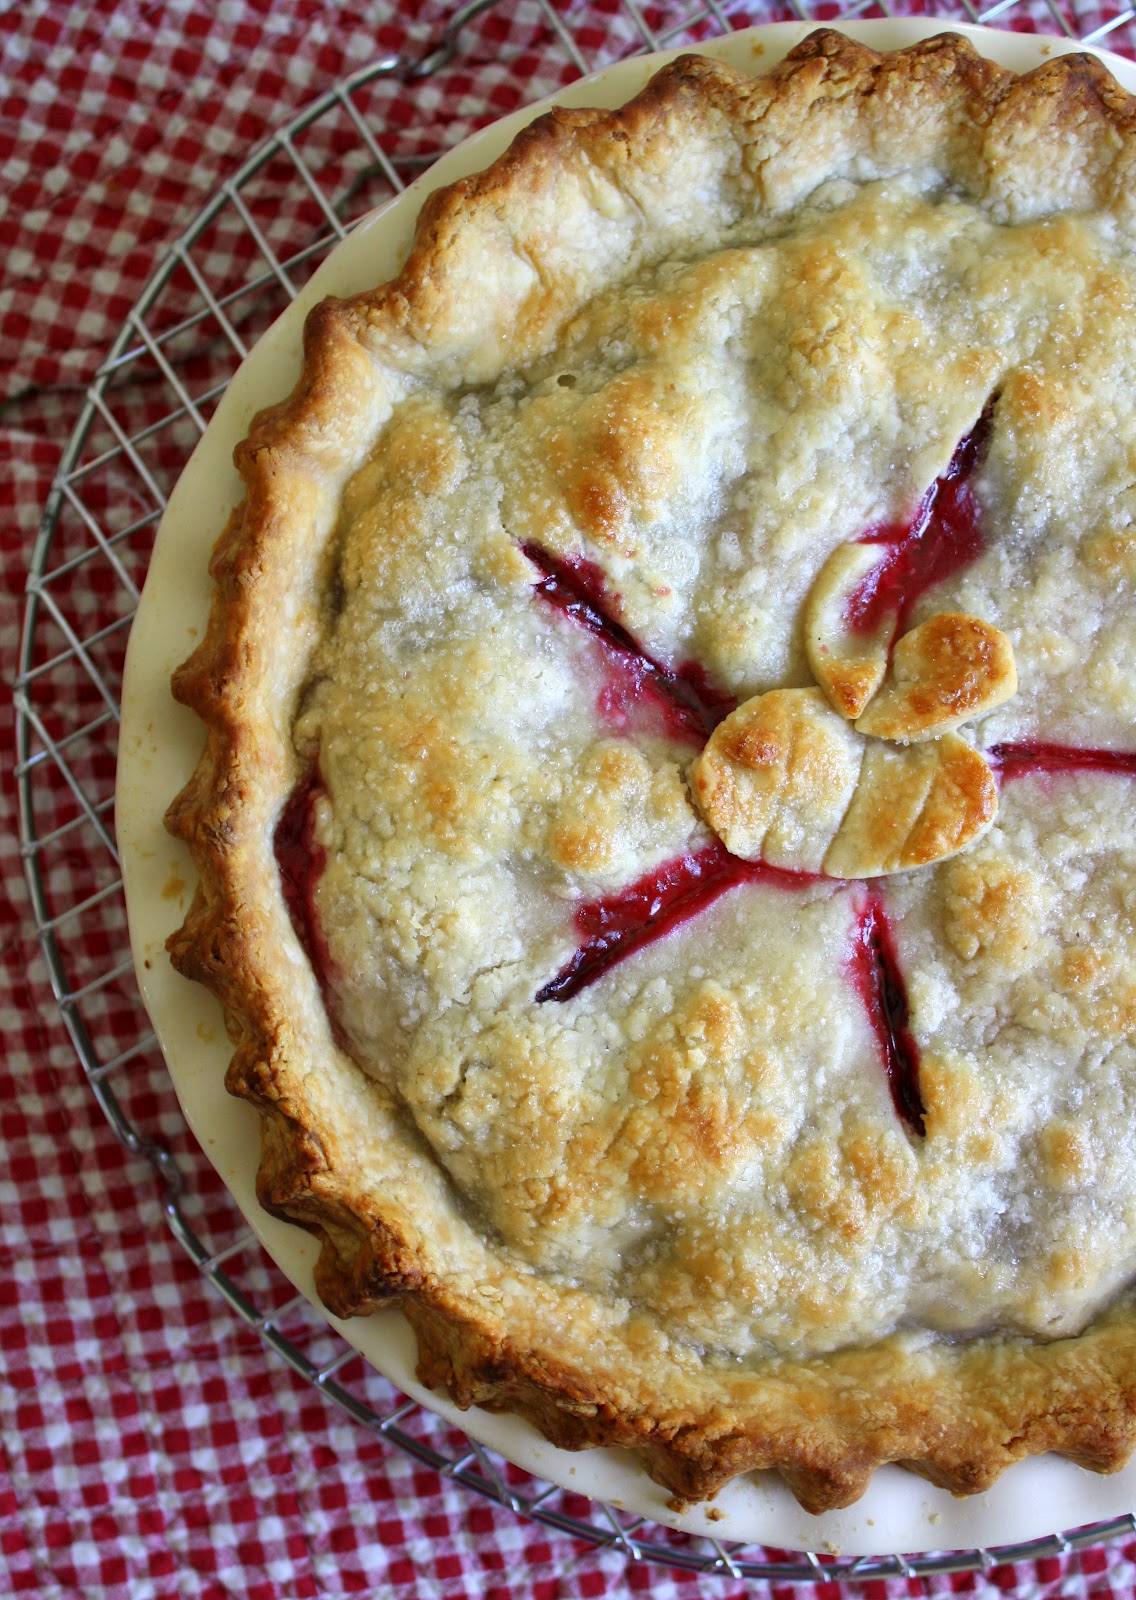
This year, though, I felt I should give Pi Day its due with a nice--what else!--pie, and it just so happened that I was already planning to make a bumbleberry pie when the special occasion conveniently rolled around. Thus we have today's treat--a bubbly, juicy, gorgeously fruit-packed dessert for all of you math lovers (and math haters) out there!


About this recipe . . . 

The crust recipe--a really good one and very reliable--came from Ken Haedrich's massive chunk of a book (over 600 pages), which is aptly titled Pie: 300 Tried-and-True Recipes for Delicious Homemade Pie. I have no doubt this volume is getting a heavy workout today in kitchens across the country.


The filling was pretty basic, so didn't require a formal recipe. I just cobbled it together based on my own past experience: thawed frozen Montmorency (sour) cherries (from northern Michigan, of course!), fresh blueberries, a few fresh blackberries, and one small, sweet, peeled Honeycrisp apple, chopped into small pieces. All of  it mixed with sugar, cornstarch, a pinch of cinnamon and nutmeg, and a splash of lemon juice. That's it! Too easy.


So what's a bumbleberry anyway, speaking of abstraction? There's no such thing! It just refers to a fruit-filling involving any assortment of berries, as well as apple and/or rhubarb.  What a great name for a pie! Bumble bees come from north and south to hover around these pies, as you can see (that little design I put on the top is supposed to be a bee . . . can you tell?).


Bumbleberry Pie
(For a printable version of this recipe, click here!)

For the crust: 

3 cups of all-purpose flour
1 Tbsp. granulated sugar
1 and 1/4 tsp.  salt (I used coarse kosher.)
1/2 cup unsalted butter, cold, cut into small chunks
1/2 cup vegetable shortening, cold, cut into small chunks
4 oz. very cold water

In the large bowl of a food processor, dump the flour, sugar, and salt. Pulse it a few times to mix it up. (You could certainly also make this dough by hand, using a pastry blender.)

Add in all of the butter pieces and pulse several times. Open the lid and use a fork to unclump the contents. Add in all the shortening and pulse several times. Open the lid again and unclump/fluff the contents with your fork. Now, drizzle 4 Tbsp. of the cold water all over the top. Pulse about six times. Drizzle in 4 more Tbsp. of the cold water and pulse again about six times. It should look crumbly, with chunks here and there the size of large peas. Gather a small bit in your fingers and squeeze it together. Does it hold together easily? If so, good. If not, drizzle a tiny bit more water and pulse again. When it's the proper texture (it should be not too sticky--too much water wrecks pie crust--and not too dry), dump it all out into a large bowl. With your hands, gather it all together into a big ball. Cut the ball in half almost evenly (the slightly larger part will be for the bottom crust), and shape each half into a disk about an inch high. Wrap each disk in plastic wrap and chill it for at least an hour, preferably longer (up to about 24 hours max) and, if you want to be on the safe side, mark them with the date/time you made them, and note which one is slightly larger (I write "top" and "bottom").

When you're ready to roll out your pie crust, take the disks out of the fridge and let them warm slightly for about twenty minutes or so. Flour your work surface, your rolling pin, and the dough disk you're about to roll out. Very lightly grease your pie plate with vegetable shortening. Roll the dough out so it's a couple of inches larger than the circumference of your pie plate. Transfer the rolled dough to the plate (I find it easiest to roll the crust loosely right onto my rolling pin and then unroll it directly onto the plate, but use whatever method works for you). If you'll be baking within half an hour or so, preheat the oven to 400 degrees. If it'll be more like an hour until you bake, refrigerate the  dough-lined pie plate.

To prepare the filling: 

4 cups frozen sour cherries, thawed and drained (I used Montmorency cherries.)
1 and 1/2 cups fresh blueberries
3/4 cup fresh blackberries
1 sweet apple, peeled and chopped into very small pieces (I used a very firm, medium-size, Honeycrisp.)
3 Tbsp. cornstarch
1/2 cup granulated sugar
1/4 tsp. ground cinnamon
1/8 tsp. ground nutmeg
1 Tbsp. fresh lemon juice
2 Tbsp. unsalted butter, room temperature

In a large bowl, place sour cherries, blueberries, blackberries, and apple pieces. Drizzle with lemon juice and toss gently to combine. In a small bowl, whisk together the sugar, cornstarch, cinnamon, and nutmeg. Scatter this over the fruit and stir gently to distribute it evenly. Set aside for about ten minutes.

When your oven is heated, and your pie is ready to be filled with fruit, pour all of the bumbleberry mixture into the shell. Dot the top with little pieces of unsalted butter. Roll out the top crust and place it over the fruit, sealing the edges firmly as you prefer (with your fingers, with the tines of a fork, etc.). Carefully cut a few steam vents/slits in the top. Brush the top of the crust lightly with milk (don't brush the edges of the pie; they're the first to darken) and sprinkle liberally with sanding sugar. Place the pie in the oven atop a baking sheet, or atop a piece of foil you've sprayed with vegetable spray (so it won't stick to your plate) to catch spills. Bake at 400 for about 25; check the pie and turn it around. If it's browning too fast, cover the top lightly with foil. Continue baking until the pie is golden, at least 15 to 20 more minutes. Lower the temperature to 375 if at any point you're worried about it burning.

Let the pie cool completely (or almost) before slicing.


(If you'd like to comment on this post, or to read any existing comments, please click on the purple COMMENTS below.)

Wednesday, June 8, 2011

An Ending, a Beginning, and Blushing Peach Mini-Pies . . .


It's the end of an era and the birth of a new one. That's how it feels around here since my oldest son, Charlie, graduated from high school a few days ago in a beautiful and moving commencement. I realized only that night, as the processional music began to play, that I had been half-consciously trying to avoid thinking of the graduation ceremony as a real watershed moment, but that's what it was. A watershed in the life of my child, to be sure, but also for our family as a whole and for me as a mom.

Let's just say it was a good thing I remembered the Kleenex.


I find myself immersed lately in a whirlwind of emotions about Charlie. Extraordinary love and affection, pride at his accomplishments, a mixture of apprehension and excitement about him leaving home for college next fall, and curiosity as to what his future may hold. It's all just amazing to me that we've come this far in the journey.


When your babies are born, you imagine all of the landmark events that will likely occur in their lives, but for a long time that's all you can do--imagine them. When one of the big events actually transpires, and you're there to witness it in a formal and celebratory setting, it's a strange and wondrous thing.


About this recipe . . .

So, what does all this maternal sentimentality have to do with blushing peach mini-pies? Not a darn thing. But I figure  that's okay, because juicy little fruit pies don't need a special reason to justify their existence.

These were put together on a hot and steamy day. When I mixed the crust, I'd originally intended to make just one standard-size pie. The crust, what with the heat wave, wouldn't roll out all that cooperatively, so I went to plan B and formed these into casual mini-pies--much easier from the assembly standpoint on a blistering day. They look sort of free form and funky because I was trying to work swiftly and throw them in the oven without delay. I managed to get five minis out of the recipe.


Aptly named, blushing peach pie's moniker can be attributed to the girlishly pink, raspberry-based syrup that you mix with the sliced fruit. Made from fresh raspberries, sugar, and water, the syrup is cooked in a sauce pan, then strained. Combined with the peaches, this stuff's really good. Talk about something worth blushing over.


This recipe hails from The King Arthur Flour Baker's Companion, a solid and chunky classic that every home-baker needs to have around. I didn't change the ingredients or their proportions, but I completely reworded the directions to reflect what I actually did.

Blushing Peach Mini-Pies

(For a printable version of this recipe, click here!)

Ingredients for the pie crust:

2 and 1/2 cups all-purpose flour or pastry flour (I used pastry flour, but I usually use regular flour for pie crust.)
1 tsp. salt (I used coarse kosher salt.)
1 cup cold butter, shortening, or lard, or a combo of these (Does anyone out there still use lard? I've never had the guts to even buy it, but I've always heard it makes for a darn fine crust. I used half butter and half shortening here.)
2 to 4 oz. ice cold water, as needed (1/4 to 1/2 cup)

To make the pie crust dough:

Whisk the flour and salt in a large bowl. With a pastry blender, work in half of the fat until the mixture resembles large peas. Then, work in the rest of the fat until the particles are about the size of rice grains. Sprinkle in the ice water, a tablespoonful at a time, while tossing the dough with a fork. You want the dough to be just moist enough to hold together when pressed in your hand. Don't let it become so wet that it feels sticky. Be judicious with the water. 


Press the dough into one big ball, cut it in half, press each half into a disk shape about an inch thick, and wrap the disks in plastic wrap. Chill them for at least one hour before attempting to roll them out. 

Ingredients for the fruit filling:
6 cups of peeled, sliced, ripe peaches
1 tsp. fresh lemon juice
1/4 tsp. salt (I used coarse kosher.)
1/4 tsp. nutmeg
3/4 cup to 1 cup of granulated sugar
1/4 cup cornstarch
1/2 cup raspberry syrup (See separate recipe for that below.)


While the dough is chilling, peel your peaches, and slice them into large bite-size chunks. Sprinkle them with a little lemon juice to help keep them from browning and set them aside. (If you prefer, you can blanch the peaches first and remove their skins that way, but it's not critical you do it that way. To blanch them, put the peaches into boiling water, boil for a minute or two; quickly remove them and plunge them into ice cold water to stop the cooking, then peel off the skins by hand. The skin should come off easily.) 

In a small bowl, whisk together the salt, nutmeg, 3/4 cup of the sugar, and the 1/4 cup cornstarch. Set aside.


To make the raspberry syrup: 

1 cup fresh raspberries
1 cup granulated sugar
1 cup water

Stir together the raspberries, sugar, and water in a medium-size saucepan over medium-high heat. Cook for several minutes, stirring regularly, until the sugar is completely dissolved. 


Remove from heat. To remove all the seeds, pour the syrup through a fine mesh sieve that's been placed over a heatproof bowl. Set aside and let the syrup cool somewhat.


To roll out the dough, mix the filling, and assemble the pie:

Preheat the oven to 425 degrees. Place a rack in the middle of the oven.


If you're making mini pies have all of your pans nearby. Remove one of the dough disks from the fridge, unwrap it, and let it sit for about five to ten minutes to soften it up slightly. On a lightly floured surface roll the dough out no thinner than about 1/8" thick. For five minis, cut out five small circles slightly larger than the diameter of your pans, and set the scrap dough aside. Working quickly, place the dough circles into the pie tins, being careful not to stretch the dough. Do the same with the second disk of chilled dough. Press all of the scraps into one ball and reroll that out. Using a sharp knife or a pizza wheel, cut the dough into little strips that will fit across the top of your mini pies. 

Quickly add to the peaches the bowl of dry filling ingredients (salt, cornstarch, nutmeg, and 3/4 cup of granulated sugar). Stir well and taste the liquid; if it's not sweet enough add in the remaining 1/4 cup of sugar. Add approximately 1/2 cup of the raspberry syrup and stir into the fruit just to combine. Scoop the fruit mixture evenly into the pie shells. 

Lay 4 to 6 of the little dough strips in criss-cross fashion over the top of each pie, crimping the edges as you wish (with your fingers or with the tines of a fork, etc.). Brush the strips of dough lightly with milk and sprinkle the crust with coarse/sanding sugar or granulated sugar. Place the pies onto a parchment covered baking sheet.


Bake for 15 minutes at 425 degrees, then check the mini pies; if they're browning too quickly, lightly cover them with foil. Lower the temperature to 375 at this point. Continue baking until the crust is golden brown and the filling looks hot and bubbly, perhaps 15 to 20 more minutes more even for minis. Cool the finished pies on a cooling rack. They can be served while still in their individual pans, or you can try to remove them from the pans when they're completely cool by flipping them over into your hand and quickly reinverting each one onto a plate.


(To comment on this post, or to read any existing comments, please click on the purple COMMENTS below!)

Friday, September 10, 2010

Autumn Apple Pie with Warm Cinnamon Sauce


I love everything about apple season. Apples are so perfect, so classic. And they never fail to remind me of childhood. I was born and raised in Michigan and, to me, fresh apples just seem like the distilled essence of a Michigan autumn--evocative in the nicest way.


In fact, if I were taking a word-association test and had to respond to the word "fruit," I'm quite sure I'd  blurt out "apple!" without missing a beat. They have such perennial appeal, and they're naturally portable. It's as if each one comes in its own protective little suitcase, making it travel-friendly. It wants to go where you go.


While not a single leaf in these parts has yet turned golden nor burnished red, and neighborhood school-kids have barely had time to crack open their textbooks or sharpen new pencils, I needed to make an apple pie. Not a grand model of complexity, mind you. Just a great hearty pie, served along with a warm, gently spicy, cinnamon sauce. What could be better than that?


About this recipe . . .

This isn't a complicated pie to put together, and it doesn't require a lot of time--both are factors in its favor. The crust, in my experience, is just about foolproof and, as it bakes, turns the loveliest color. The filling is neither time consuming nor does it require any exotic ingredients.


A wedge of this pie is completely satisfying on its own--no question about it. But drape it with a spoonful of the buttery cinnamon sauce and it takes on an added dimension that sets it apart. Really, really good pie!


I borrowed from a couple sources in making this pie. The crust recipe is from Apple Pie Perfect, by Ken Haedrich, and the filling recipe was inspired by one in Carole Walter's book Great Pies & Tarts. I could spend hours (and come to think of it I guess I have!) immersed in Walter's many cookbooks. They're amazing.


The sauce was just something I experimented with after looking at the directions for basic sweet sauces in a number of places; it's elementary and is one of those things, kind of like ganache, that hardly seems to require a formal recipe.


Autumn Apple Pie with Warm Cinnamon Sauce

(For a printable version of this recipe, click here!)

Ingredients for the crust:
3 cups All-Purpose flour (I used unbleached)
2 Tbsp. granulated sugar
3/4 tsp. salt (I used kosher)
3/4 cup cold unsalted butter, cut into chunks
1/4 cup cold vegetable shortening, cut into chunks
1/2 cup very cold water

To make the crust:
In the large bowl of a food processor, place the flour, sugar, and salt. Pulse several times to mix. Take off the lid and toss in the butter chunks. Pulse again, about 6 times, to cut the butter in. Again remove the lid and, using a fork, fluff up the mixture, scraping down to the bottom of the bowl. Toss in the shortening cubes and pulse about 6 times, then take off the lid, scrape the bottom, and fluff again with a fork.

Drizzle only about half of the cold water in and pulse 6 times. Fluff the dough again with a fork, then sprinkle in the remainder of the water. Pulse a few more times, until the dough begins to clump together. Dump it out into a clean mixing bowl.

Test the texture of the dough by squeezing a bit of it in your hand. If it's too dry and won't hold together, sprinkle in a tiny bit more water, one teaspoon at a time, working it in gently with your fingers. When the dough holds together, divide it into two pieces, one slightly larger than the other, shape each into a ball, and flatten the balls into disks about 1" thick. Wrap the disks in plastic wrap and chill them in the fridge for about an hour or so. While the dough is chilling, make the apple filling.

(*If you'd prefer to make the dough entirely by hand, use a pastry blender and a large mixing bowl to combine the ingredients, following the same general steps above in the same order. After you've cut in the butter, the dough should be in bits about the size of split peas. After you've cut in the shortening, the dough should be in smaller bits, perhaps the size of coarse cornmeal.)

Ingredients for the apple filling:

Approximately 7 to 9 large apples (I used some Granny Smiths, and a few nice Honey Crisps, but you should use any nice, firm, baking apples that you prefer. I've also had great luck in the past with really fresh Gala apples. I believe this is a good pie to experiment with, in this regard. I used probably 9 apples and my pie was piled high!)
1 Tbsp. fresh lemon juice
3/4 light brown sugar (not firmly packed)
1/4 cup granulated sugar
3 Tbsp. cornstarch
1 tsp. ground cinnamon (or a little more if you adore the stuff! I adore it . . .)
1/8 tsp. ground, or a few scrapings of grated whole, nutmeg (I used grated; use with discretion--this stuff's powerful!)
1 Tbsp. unsalted butter

To make the filling:
Peel apples and cut into 1/4 inch slices, dropping them into a large mixing bowl. Toss the pieces with the lemon juice. In a small bowl, combine the sugars, cornstarch, cinnamon, and nutmeg. Don't add this to the fruit yet-- just set it aside.

* * * * 

Preheat oven to 400 degrees, and place a rack in the lower third of the oven. Brush the inside of a 9" pie plate with a light coating of soft unsalted butter. Remove just the larger ball of dough from the fridge, unwrap it, and place it on a lightly flour-dusted work surface. Roll the dough into a 13" circle and place it carefully into the pie plate; try not to stretch it in the process. Trim the edge so you have an overhang of up to one inch.


Ingredients for egg wash (to brush on inside of pie shell and on top of top-crust before baking):
white only from one large egg
1 tsp. water

To make the egg wash:
Whisk the egg white and water together with a fork. Using a pastry brush, brush the bottom, sides, and edge of the raw pie shell lightly with the mixture.

* * * *


Now, pour the sugar mixture into the apples and stir to coat the pieces.


Shovel your apples into your pie shell, mounding them high in the center. Dot the fruit with bits of the 1 Tbsp. of butter.

* * * * 

Roll out the second disk of dough into a 13" circle and place it over the fruit. Trim the edge of the dough, and seal the edges together by crimping it closed with your fingers or with the tines of a fork, as you prefer. Cut a few small vents in the top crust to release steam. Gently brush the top crust with more of the egg wash, and then sprinkle the crust with a few pinches of plain granulated sugar or cinnamon sugar.


To keep the edges of the pie from burning in the oven, cover them with foil shaped to fit. (My trick is to take a square of foil about 13" x 13",  fold it into quarters into a smaller square, then I cut a large wedge shape out of the inner section. If done right, when I unfold it I end up with a nice round hole in  the middle of a  border of  foil that can be placed atop my crust and gently secured on the outer edges so it won't shift around. I find this is quicker and much less cumbersome than trying to shape random strips of foil around the edge of a pie.)

Place the pie in the oven. About 20 minutes into baking, place a baking sheet beneath; this will help prevent the bottom from burning. Check the pie again periodically; if the top crust appears to be browning quickly, lightly place a sheet of foil atop it and leave it there until the pie is done. Peek also at the edges of the pie to check if they're browning; if they're not, remove the foil border about ten minutes towards the end of the baking time.

Depending in part upon the type of apples you used, your pie may take 40 to 55 minutes. There should be bubbling evident through the vents, and the pie should be golden all over before you decide it's done. If you like softer fruit, plan to bake the pie on the longer side.

Let the pie cool on a rack for at least three hours before cutting.  Make the cinnamon sauce while you're waiting.

 
Ingredients for the cinnamon sauce:
1 and 1/2 cups water
3 Tbsp. unsalted butter
1/2 cup brown sugar, light or dark
1 and 1/2 tsp. ground cinnamon
1 Tbsp. cornstarch
1 Tbsp. water


Dissolve the cornstarch with the 1 Tbsp. of water in a very small bowl. Stir until it's smooth.


In a small sauce pan, combine the 1 and 1/2 cups water, butter, brown sugar, and cinnamon. Bring to a low boil, then turn the fire down and let it simmer for a few minutes, stirring frequently. Stir a couple spoonfuls of this hot mixture into the cornstarch mixture to temper it; then pour this back into the sauce pan and stir continually on low heat until the sauce thickens. Strain the sauce into a bowl to remove any lumps. Serve it warm, spooned over slices of the baked apple pie.


*If you like this recipe, but you want to guarantee that there's not a lot of juice in the baked pie, I recommend you check out this apple pie post I did last year. It's a more involved and time consuming process (you precook the fruit for a while, etc.) but it produces a truly exceptional pie.

(If you'd like to comment on this post, or to read any existing comments, please click on the purple COMMENTS below!)

Monday, April 12, 2010

Mission Accomplished: Michigan Cherry Pie with Lattice Crust


I made a cherry pie this weekend, but not just any cherry pie--it was a birthday pie. Charlie, my oldest son, turned seventeen on Saturday, and he's never really been one for cake, so it came as no surprise when he ordered up pie for the occasion. It has, for years, been his favorite dessert.

You know how some kids would rather have a mass-produced chocolate chip cookie than one of their mom's homemade cookies? Well, Charlie is kind of like that when it comes to cherry pie. He loves that bland, bright pink, gelatinous goop that comes in a can with a few token cherries. Of course, you know as well as I do that the canned filling isn't much good, but it is the kid's birthday.

So, rather than sacrifice all of my principles and make him a pie using that stuff, I decided I'd try to make a homemade filling that more or less mimics the canned in color and texture, yet tastes better and contains more fruit. (Oh, and speaking of the fruit, I was only too fortunate last week to get my paws on a few bags of frozen Michigan pie cherries. Michigan is ALL ABOUT cherries, and these were obscenely on sale, thus not to be passed up. I forked over the cash, scurried home under cover of darkness, and tossed those babies into the basement freezer for future reference.)


To recreate the characteristic gooey aspect of canned filling, I used ClearJel instead of cornstarch as a thickener. ClearJel, which is a form of modified corn starch, has advantages in some situations over cornstarch. It doesn't add a cloudy aspect to whatever you mix it into, and if it's used in a pie that's going to be frozen, it retains its stability once the pie is thawed. For a lot of people, it's the thickener of choice for this particular sort of pie.


(In fact, I must mention that it was a friendly fellow baker, Linda Aukerman of Ohio, who encouraged me to give ClearJel a whirl recently; she sent me some in the mail a few weeks ago, and I'm so glad I'll be able to tell her that I finally gave it a go! Linda is quite the home cook and baker, and she was featured in the Penzey's Spice catalog not too long ago. We chat by email now and then. She's just the nicest gal.)

 (Hey, this is slightly off the immediate subject, but have you ever tried rolling out your pie dough on an all-cotton cloth that's been dusted with flour? Try it once and you'll never go back, girls. Not kidding. Learned this trick at school this year. Makes the whole rolling-out process a hundred times easier, assuming you've got decent dough to start with!)

The filling turned out to be pretty darn tasty and just what I was aiming for. Charlie thought it was spectacular, even though it didn't even come from a can, and that was my goal--a happy birthday boy. Mission accomplished!


Michigan Cherry Pie with Lattice Crust

(For a printable version of this recipe, click here!)

Makes one generous, standard size, deep dish pie:

Pastry for one 2-crust pie (My favorite pie crust recipe can be found here, in an earlier post!)

frozen sour cherries, I used all of a 40 oz. bag (or, use at least 6 cups)
granulated sugar, 2 cups
ClearJel (regular, not instant) 1/2 cup
cold water, 2 and 2/3 cups
fresh lemon juice, 2 Tbsp. and 2 tsp.
cinnamon, 1/4 tsp.
almond extract, 1/2 tsp.
red food coloring (optional; you may want to add a tiny bit)

Thaw the frozen cherries completely in a colander or strainer set over a large bowl, and save all of the juice that drains off. (If you don't wait for the cherries to completely thaw and drain, they'll release too much juice while the pie is baking, and the filling will become too runny, so be patient.)


Use all of that juice to replace a portion of the water in the recipe (for eg., if  you get 1/3 cup of juice, use that to replace 1/3 cup of the water).

Combine the sugar, the ClearJel, and the cinnamon in a large saucepan. Add in the water, cherry juice, and almond extract. Stir, over medium-high heat, until hot and bubbly.

 Add in the lemon juice and heat to boiling; let the mixture boil for one minute.


Remove the pan from the heat and pour the mixture over the cherries in a large bowl. Fold together gently, so as to not break the cherries.


Lightly grease a deep dish pie plate with vegetable shortening.


Roll out your bottom crust on a lightly floured surface and line the pie plate; take care not to stretch the dough. Fill the pie shell with the warm cherry mixture.


To make a lattice top-crust, roll out your top crust dough, and then cut it into strips of even width, about a half inch wide or so, using a pastry wheel or a sharp knife.


Lay half of the strips across the top of the pie going in one direction. Pull back the alternate strips, as shown below.


Then, one by one, weave in the remaining strips going in the opposite direction; start with the longest strips in the middle of the pie.

/
 

Work quickly, so the strips don't get too warm, but also work gently so you don't tear them. Finish off the edges of the pie as you prefer, perhaps using any leftover dough to help make a border. (I made a little impromptu scallop design on the border of this pie with the side-edge of my pastry wheel . . . not too neat and tidy looking but necessity is the mother of invention, is she not?)


Brush cream or milk lightly on the lattice, taking care not to drip milk into the filling. Sprinkle coarse or granulated sugar on top of the milk, also just on the lattice.


Bake the pie in a preheated 400-degree oven for about 35 minutes or until the crust is golden brown. If the crust seems to be browning too quickly, cover it lightly with foil. Let the baked pie cool completely, on a rack, before attempting to cut it. It will take a few hours to cool fully.

 
P.S.  Enjoy munching your Michigan cherry pie . . . and next time you're here for a visit in the middle of the summer, head to cherry country in the northern part of the lower peninsula. They're worth the trip! (Even the folks at National Public Radio love Michigan cherries, as evidenced here!)


(If you'd like to comment on this post, or to read any existing comments, just click on the purple COMMENTS below!)