Showing posts with label sorbet. Show all posts

Monday, December 17, 2012

Cactus-Pear & Cherry Sorbet . . .


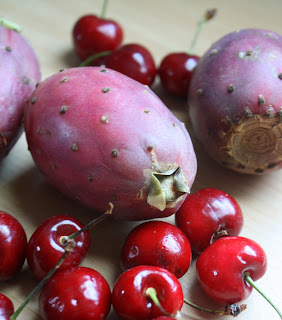
Just last week, I made the personal acquaintance of a cactus pear. Actually, several of them. They were purplish, slightly soft, and a wee bit spiky. I had no choice but to get to know these cactus pears, because they were one component (out of seven different components) that I was forced to confront as part of the "practical final" in my most recently concluded pastry arts class, Plated Desserts II. This final, which I'd been dreading for weeks if not years (undoubtedly since I first heard about it shortly after starting culinary school, ages ago, and witnessed the terror it invariably invoked in the advanced pastry students), required me and my classmates to create a visually striking and tasty dessert within just a couple of hours from start to finish. Not so difficult, you say? Well, consider the fact that a bona fide plated dessert--composed of various textures, temperatures, colors, and flavor types--typically consists of several individual recipes, and the need to combine all the mysterious ingredients into one coherent and comely dessert in that period of time is actually a rather tall order.


The other six ingredients we had to make use of besides cactus pears were unblanched brazil nuts, unpopped popcorn, quinces, cardamom pods, brick dough (also known as feuilles de brick, this is kind of like a tougher and more transparent version of phyllo dough), and coconut sugar.

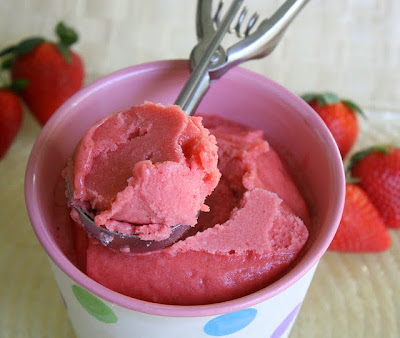
The fact that I completely forgot to photograph my dessert, once finished, helps illustrate how frazzled I must have been by the time I presented my finished plate to my teacher, a fellow we'll simply refer to here as Chef R. It was not what my husband would describe as "a triumph"--a phrase he often likes to use in reference to especially well-prepared and delicious food. No, it was a partial success and that's all it was. The part of it that was a complete success, was the sorbet portion. That sorbet, which was somewhat similar to today's recipe, was brilliantly pink and made a dramatic impression on the plate. It was zesty, sweet, and tart. It was positively psychedelic.


There was also a cactus pear sauce, equally vivid, neatly dabbed onto the plate like a tiny path, that served as a dividing line between the dessert's two main components. To the left was a perfectly egg-shaped scoop of sorbet (also known as a quenelle), with a delicate golden tuile balanced on top. The sorbet sat on a circle of crumbly streusel that I'd made from a ground combo of toasted brazil-nut brittle and popped, salted popcorn. That sorbet and tuile construction was parked near my attempt at a warm, spicy, stewed quince concoction enclosed within a crisp, baked, brick-dough basket. A cute basket, no doubt, but with sticky, sugary contents that were barely edible. Really. I joke you not. Something went terribly wrong with my stewed quince. The whole thing became gritty and grainy and wasn't at all becoming. And the cardamom in there seemed overwhelming . . . too much cardamom. As I brought my plated creation up to Chef R. at the appointed hour so he could render judgement, I knew I was a girl with a problem.

Chef R. was not impressed with the right side of the plate. Alas.

But, he did say he really liked the sorbet and thought the whole concept, at least in terms of looks, was attractive and appealing. Overall, it could have been worse. I suppose I was just glad all those weeks/months/years of anxious anticipation were over. I'd completed Plated Desserts II and, really, that was reward enough.


It was a tiny consolation, to be honest, that the other members of the class seemed to have a less than complete triumph as well. We all felt, though, that we tried the best we could given the limitations we were forced to work with. And Chef R. was only encouraging in his closing comments to us, as we gathered up our belongings and prepared to offer our fatigued goodbyes. Before we left the room he urged us to keep taking baking/pastry classes even after we complete the formal requirements of the program (I have one more class to go). Because, after all, there is always more to learn. Indeed.


Cactus-Pear and Cherry Sorbet

(For a printable version of this recipe, click here!)

4 very ripe cactus pears
1 pound sweet cherries
12 ounces simple syrup, cooled
1 to 2 tablespoons fresh lime juice
2 teaspoons cherry (or other fruit-flavored) liqueur (I used Heering cherry liqueur; you could use Kirschwasser, or Chambord, or even Limoncello would probably be good.)

Cut the cactus pears in half, lengthwise, and scoop out the pulp with a large spoon. (Be careful; the outside of a cactus pear may have tiny spines left on it that you can't really see.) 

Pit the cherries and cut them in half.

Put the pulp and the cherry pieces into a deep straight-sided container and blend them with an immersion blender until no large chunks remain. Strain the mixture into a medium size bowl. Rinse out the deep straight-sided container. Pour the mixture back into it, along with all of the simple syrup.

Blend the mixture again until all lumps are gone and it looks smooth. Strain the mixture again into a bowl, this time with a fine mesh strainer. You're trying to catch any seeds from the cactus pears; they are very hard and black.

Stir the smaller amount of lime juice, along with the liqueur, into the strained sorbet mix. Taste the mix, and add more lime juice if you prefer. Don't add more liqueur; too much alcohol will make it difficult for the sorbet to firm up in the freezer.

Chill the sorbet mix until extremely cold and churn it in your ice cream freezer according to the manufacturer's directions.

Put the churned sorbet into a chilled container that can be tightly covered and freeze it for at least several hours. I froze mine for over a day before serving it; it needs time to get really firm, and for the flavors to ripen.

Serve in small portions. Nice as a very light dessert, or as a palate cleanser between courses.

(If you'd like to comment on this post, or to read any existing comments, please click on the purple COMMENTS below.)

Friday, May 6, 2011

Blueberry Banana Sorbet & Whimsical Tuiles . . . (How to Make Your Own Tuile Stencils)


I am psyching up to begin another pastry class next week. This one, Pastry II, goes until the very end of June. So, besides readying my psyche, there are a number of other things I need to prepare in order to launch quickly from the house come 6:30 a.m. on Monday morning. The supplies alone can require a pack mule--notebook, binder, textbook, recipe packet, apron, neckerchief, chef's coat and pants, chef hat, digital scale, digital thermometer, and the rather awkward and weighty knife-filled case that is the unmistakable identifying mark of a culinary student in transit.


Yesterday, while sorting through my papers from last semester, I happened upon the recipe for tuile dough that I used as one small part of my "practical final" exam in my Plated Desserts I class this winter. I'd always intended to make tuiles at home and blog about them, and this seemed like a good time to finally do it.


In case you're not familiar with them, a basic tuile (pronounced tweel), which means "tile" in French, is a very thin, slightly sweet, rather bland cookie made from an exquisitely short list of  ingredients--typically just butter, powdered sugar, egg whites, and flour, though additional ingredients like sliced almonds are not uncommon. A tuile's most unique characteristic is the fact that it can be shaped/curled/molded by hand while it's still very hot.


Tuiles are not really something that one can mass produce in a short period of time at home, but that's hardly a concern. They allow for so much customizing and creative interpretation, they're worth the trouble. And, best of all, they're actually a lot of fun. Do they require some planning? Kind of. If you want to make them into particular shapes, then yes, definitely, because you'll need templates. Rubber or plastic templates specifically made for tuiles can be purchased, but they're pretty costly. The templates I used are my own; I made them using thin, soft, non-toxic craft foam from Michael's craft store. I cut the designs out of the foam with an exacto knife.


The sky's the limit in terms of shapes if you're making the templates yourself. The foam sheets are very inexpensive so it's no big deal if you make a few mistakes. And, if you just want to make plain round tuiles, you won't necessarily need to use templates at all.


Tuiles make perfect serving vehicles for other dessert items. Ice cream, sherbet, sorbet, and mousse all love nestling close to tuiles. They provide the perfect crunch factor and their lack of assertive flavor works to their advantage. Case in point: What might go well with a wacky item like blueberry banana sorbet? A thick chocolate cookie? Yuck. An overwhelmingly lemony cookie? Ehh, not so much. A lovely, crunchy, sweet-but-subtle tuile? YES!


About these recipes . . . 

I adapted this sorbet from pastry chef David Lebovitz's book The Perfect Scoop, including twice as much banana as the recipe called for, along with a bit more sugar and slightly more blueberries (yeah . . . I had to get rid of  those speckled bananas languishing on the counter . . . again). It's a simple, casual treat, and it's even fat free. The flavor combo seems a little off the wall, but if it's good enough for David Lebovitz, well, enough said. You could make this and have it chilling in your freezer inside of half an hour if you're quick on your feet. It's easier than heck--no fussing required.


The tuile recipe is from Professional Baking, by Wayne Gisslen. That was the textbook used for my Pastry I class last autumn, my Retail Baking class a year ago, and even for my Plated Desserts I class that ended a couple of months ago. It's a pretty thorough volume. Another remarkably easy formula, it's practically impossible to screw up. And, you can make the dough ahead of time because it has to chill for at least an hour before you spread it.

Blueberry Banana Sorbet and Tuiles
(For a printable version of these recipes, click here!)

Yield: One quart of sorbet and at least two dozen average size tuiles

Equipment for sorbet:
-- food processor or blender

-- ice cream maker, or ice cream maker attachment for your mixer
-- 1 quart container in which to chill finished sorbet

Equipment for tuiles:
Food scale to measure tuile ingredients
1 or 2 Silpats (silicone pan liners) or parchment paper
1 or 2 very flat cookie sheets
1 small offset spatula
scissors
flexible tuile templates


Ingredients for sorbet:
2 and 1/2 cups frozen wild Maine blueberries (They're little, very blue, and sweet; I buy them in large bags from Costco. Of course, if you have good fresh berries on hand, don't hesitate!) 
4 medium size very ripe bananas
1 and 1/4 cup granulated sugar
1 cup cold water
1 Tbsp. lemon juice 


In a food processor or blender, pulse together all of the ingredients until the blueberries look almost  pulverized and the mixture looks not-quite completely smooth. 


Then process the mixture according to the instructions for your ice cream maker. (I used the ice cream maker attachment for my KitchenAid mixer, mixing on low speed for almost 20 minutes. Then, I put the sorbet into a container and froze it for several hours before serving. It doesn't freeze rock hard, and it scoops nicely.)


Ingredients for the tuiles: 
2 and 1/2 oz. (5 and 1/3 Tbsp.) of unsweetened butter (An extra high-fat brand like Plugra is often recommended for tuiles.)
3 oz. cake flour or all purpose flour, sifted (one scant cup) 
3 oz. powdered sugar, sifted (about 3/4 cup)
2 and 1/2 oz. egg whites (approximately, the whites of two or three large eggs)


In the bowl of a mixer, cream together the butter and powdered sugar; start on low speed, then increase to medium as the sugar mixes in. Add in the egg whites and flour alternately, mixing until combined. The dough should be kind of thick, sticky, and stretchy.


Scoop all of the dough into a disposable pastry bag with an un-cut tip (not critical to have a pastry bag, but helpful to do it this way!) and refrigerate it for one hour or more. 


You'll trim the tip off the pastry bag right before you use the dough. 

If you'd like to make decorative little designs in the tuiles after the dough has been spread on the templates, separate out a couple tablespoons of the dough before it's chilled and mix a teaspoon or two of cocoa powder into it. 


Put this cocoa dough into a very small pastry bag, preferably one made of parchment paper (here's a site that shows how to make one of these; it's a foundation skill for cake decorators and pastry chefs!). It will need to have a tiny opening tip that you will trim with scissors right before you're ready to use the dough.


Once the dough has chilled sufficiently and you're getting ready to bake, preheat the oven to 325. 

Take a perfectly flat cookie sheet without sides (or use the back of a cookie sheet with sides), and place your Silpat or parchment sheet over it. This process is stress free if done on a Silpat type of pan liner, just fyi. If you're using parchment, it should be cut to fit the cookie sheet without overlapping the sides. 


Place your tuile template over the Silpat/parchment. Cut the tip off of the filled pastry bag, about an inch up from the point. Squeeze a plump line of dough onto each template shape you'll be using. 


With the offset spatula, carefully spread the dough smoothly into each cut-out. You may need to hold the template sheet in place with one hand if you're doing this on parchment. 


If you want to add decorative designs in the dough with the cocoa dough, do it now. Cut the tip of the parchment cone with the cocoa dough in it and create any designs you like, just squeezing a tiny line onto the plain dough.

When all the shapes you're using have been filled, gently lift the edge of the template and peel it off. 


Bake the tuiles for approximately 6-7 minutes,just until they begin to get lightly golden. They bake quickly and burn easily; keep a close eye on them. 

Using the offset spatula, carefully lift each piece, working with just one at a time, and mold it quickly with your hands or press it over a form (like a small, upside-down drinking glass) to make it into a bowl shape. It will be quite hot so use care. If a tuile cools into a shape you didn't intend, you can put it back in the oven to soften it and try again. The tuiles will start to harden within about 15 seconds, so you don't have any time to fool around once you start doing this. Store the finished tuiles away from moisture.


(If you'd like to comment on this post, or to read any existing comments, please click the purple COMMENTS below!)

Friday, February 11, 2011

Strawberry Sorbet with Crispy Coconut-Lime Cookies . . . A Winter Strawberry Reverie


I don't mean to shock you, but we're not going to talk about bad weather. We're not going to rant about ice and snow. Nope, we're going to pretend it's a pleasant 80 degrees. You know the phrase "willing suspension of disbelief," right? Well, that's what will be required of us. So put on those rose-colored glasses. Try to think warm thoughts.


Mentally meander back to the last time you tasted something that was the absolute antithesis of winter.  I'll bet it was gloriously sunny outside, you were wearing something light and airy, and though it was around 7pm sunset was still at least two hours away. Does that scenario ring a distant bell? It does for me. We're going to recreate that moment, if only in our imaginations. To nudge the dream along, I recommend this incredibly simple but flavor-packed sorbet.


You can concoct this with the strained pulp of fresh strawberries, of course, and if it's actually summer in your corner of the world and you have access to local berries, then by all means go for it. But if imported strawberries are your only option you may need an alternative. Let's face it, after the bumpy journey across a couple of international borders, how could any tender berry not be tuckered out? Those winter strawberries may be pretty, but their luster is often superficial, their joie de vivre a thing of the past. Are they even slightly sweet? Don't lay odds on it. Only way to tell is to buy 'em and try 'em, and that's a calculated risk.


If you don't want to chance it with imported berries, use frozen pure-fruit pulp (don't scoff, pastry purists!). It's the neatest thing to pluck from your freezer, on a whim in the dead of winter, a couple packages of this stuff and use it to create something so delectable. If, however, you had the foresight last summer to freeze bags of your own strawberry puree, prepared from super-fresh fruit that you picked yourself, please pat yourself on the back because, frankly, you are a genius. Not all of us are that prescient though, which is why I used two 14 oz. packages (only about $2.00 per pack) of strawberry pulp that I'd purchased last fall from a wonderful Detroit market specializing in Central American foods. Called The Honey Bee La Colmena, this store's slogan is, "Wake up and smell the chorizo." Next time we visit The Honey Bee, I'm going to stock up and try the mango and passion fruit purees, too. It's good stuff.


This sorbet recipe, adapted from the book Professional Baking, by Wayne Gisslen, is so easy it's hardly a recipe at all. Sugar and water are cooked to a syrup, then mixed with the strained fruit puree/pulp (frozen or fresh). I decided to add in a teaspoon of Chambord, a sweet French liqueur made from red and black raspberries, to improve the texture of the final product (the tiny bit of alcohol helps keep it from freezing rock hard). The liquid mix is chilled for a few hours, churned in an ice cream maker, and then plunked into the freezer until firm.

This thin coconut-lime cookie is a nice one, too. Not heavy-duty like shortbread, nor fussy like a tuile, these just-delicate-enough coconut wafers are jazzed up with a little lime zest and juice. Dessicated coconut (dry, finely shredded, and in this case unsweetened) gives them a pleasing nubby texture. These cookies are a great sidekick to the sweet and tangy sorbet.

I adapted the cookie recipe from Classic Stars Desserts, by pastry chef Emily Luchetti. Her original formula called for sesame seeds, sliced almonds, and sweetened shredded coconut. That all sounded fine, but in this case I thought it might make for an overcrowded cookie, so I omitted all of those, switching in the lime, a smidgen of almond extract, and using the dried unsweetened coconut as described above. I also rolled the chilled dough in sanding sugar before slicing and baking (these are basically refrigerator cookies).


You can make this dough well before you need to bake it since it needs time to chill. In terms of scheduling your real life, these cookies dovetail cooperatively with the sorbet; they're both desserts that conform to your schedule versus the other way around. Not sure that's ever happened to us before!


Strawberry Sorbet
(For a printable version of these recipes, click here!)

28 oz. fresh or frozen strained and pureed strawberry pulp
12 oz. granulated sugar
8 oz. water
1 tsp. Chambord, or a similar fruit based liqueur

In a large saucepan, heat the sugar and water over a medium flame until the sugar has completely dissolved, stirring now and then. Remove the pot from the heat and let the mixture cool. Stir in the fruit puree and the Chambord.


Chill in the refrigerator in a well-sealed container for at least several hours. Churn in an ice cream maker according to manufacturer's directions. Pour the churned sorbet into a clean container, seal it, and freeze until firm.


Thin and Crispy Coconut-Lime Cookies

7 oz. unsalted butter at room temperature (That's 2 sticks minus 2 Tbsp.)
2/3 cup granulated sugar (I used cane sugar.)
1 and 1/4 cups All Purpose flour
3/4 cups finely shredded dried coconut, unsweetened (I buy this from Whole Foods or from a health food store; I don't think I've ever seen it for sale in a traditional grocery store.)
1/4 tsp. almond extract
2 tsp. fresh lime juice
zest from 2 limes

In the bowl of your mixer, using the paddle attachment, beat the butter and sugar on medium speed until smooth (should be less than one minute). On low speed, add in the flour, coconut, almond extract, juice, and zest. Mix just until well combined.


On a lightly floured sheet of parchment paper, roll the dough into an 18" log.


Wrap the parchment snugly around it, maintaining its shape as you go. If you like, preserve its shape by sliding the wrapped dough into an empty paper towel tube.


Place the dough into the fridge or freezer to chill until it's quite firm (at least half an hour in the freezer, or an hour or more in the fridge).

About 20 minutes before you're ready to bake, preheat your oven to 350 degrees.

Line a couple of cookie sheets with clean parchment. Unwrap the dough, roll it in sanding sugar (medium-sized coarse sugar) if you like, pressing gently so the sugar adheres.


Slice the dough into 1/4" to 1/3" thick pieces using a very sharp knife. Place the pieces on the lined cookie sheets, leaving about 2" between each one; the cookies will spread out.


Bake for about 15 minutes, or until lightly golden. Let the cookies cool on the cookie sheets for at least 5 minutes before attempting to remove them to the cooling rack. They'll be floppy at first, but will firm up and get crispy as they cool.


Store the cookies well covered.


 (If you'd like to comment on this post, or to read any existing comments, please click the purple COMMENTS below!)

Wednesday, March 10, 2010

Berry Merlot Sorbet . . . with Citrus-Shortbread Cookies

They say that the Benedictine monk, Dom Perignon, compared tasting a particular wine to "tasting the stars!" Whether he ever really said that, though, seems to be up for debate. But unsubstantiated or not, that's the very phrase I remembered when the first tiny spoonful of this lusciously icy, pungently sweet sorbet hit my tongue. That may sound like corny hyperbole, but I wouldn't make something that corny up. I swear.

Now, given the typical choice between a petite scoop of premium ice cream and one of sorbet, I've historically been more likely to select the former.

That, however, was until this week when I made my first homemade sorbet. (Ice cream, I'm sorry. It's been fun, but I've found a new friend.)

There simply aren't enough adjectives to describe the glorious flavors in this recipe. Have you ever before had a reason to simmer raspberries, blueberries, orange and lemon slices, together with a split vanilla bean, sugar, and a fragrant cinnamon stick? No? Well, neither had I. Add into that concoction a generous splash of Merlot and a modest splash of Chambord, and the result is truly cosmic.

About the recipes . . .

Adapted from a recipe in pastry chef Sherry Yard's sumptuous book, The Secrets of Baking, this sorbet is an experience in itself. One might rightly say it's divine. And since divinity shouldn't have to travel alone, we're serving it up alongside citrus-shortbread moons and stars.

What with the intense sweet-tartness of the sorbet, these uncomplicated cookies provide a nice counterpoint. They come to us via Chef Todd English's book, The Olives Dessert Table.

The sorbet, which requires making a sauce/syrup first, does take some time but it's worth the wait. And I was pretty pleased with the shortbread recipe, too. The dough is extremely cooperative and easy to handle, considering it's rolled out and then cut with cookie cutters--no heroics or profanity required (you know what I'm talkin' about).

I know it's still March, but before I shut-up I just have to tell you: This combo virtually shrieks summertime. Shrieks it!


Berry Merlot Sorbet, with Citrus Shortbread Cookies

(For a printable copy of these recipes, click here!)


To make the sorbet, begin by preparing the berry sauce. The sauce recipe should yield up to about one quart (four cups). You'll need half of that to prepare one batch of the sorbet. The extra sauce can be stored for future use.

Sauce Ingredients:

1 and 1/2 lbs. fresh, or 20 oz. frozen, berries (I used half frozen raspberries and half frozen blueberries; Sherry Yard's original recipe calls for all blackberries.)
1 orange, peeled and sliced
1 lemon, peeled and sliced
1/2 cup, plus 2 Tbsp., granulated sugar (Just use 1/2 cup if you're using frozen berries, per Sherry Yard.)
1/2 vanilla bean, split and scraped (I used a whole bean and all of its seeds.)
2 cups Merlot wine (I used Charles Shaw Merlot, from Trader Joe's--only about $4 a bottle!)
1/2 cup water
1 three-inch cinnamon stick
3 Tbsp. Chambord (raspberry flavored liqueur)
1 pinch of salt (less than 1/8 tsp.)

Bring the berries, orange, lemon, sugar, vanilla bean and seeds, Merlot, and water to a boil in a large saucepan over medium heat. Microwave the cinnamon stick on high for 10 seconds, or heat it up in a small pan until fragrant; add it to the sauce. Reduce the heat to low, and simmer the sauce for 10 minutes.

Remove the pan from the heat, cover it with plastic wrap, and let it steep for 30 minutes; this allows the flavors to infuse.

Pour the mixture through a fine mesh sieve and press out the juices into a medium-sized bowl. (Don't let the fruit get into the juice, and don't puree the mixture either. Sherry Yard notes that doing so will make the sauce cloudy.)


Place the bowl of juices over another larger bowl filled with ice, and let it cool completely.


Stir in the Chambord and the salt.


This sauce can be used immediately, or it can be refrigerated in an airtight container and kept for up to 3 days. Frozen, it will last for 3 months.

To prepare the sorbet:

2 cups of warm berry Merlot sauce
2 Tbsp. fresh orange juice
2 Tbsp. light corn syrup
1 Tbsp. fresh lemon juice (The original recipe says to use lime juice, but I used lemon instead.)
2 Tbsp. granulated sugar
1 pinch of salt (less than 1/8 tsp.)

Whisk together all of the above ingredients in a large bowl. This is the base for the sorbet.

Pour the sorbet base into an ice cream maker and churn the mixture according to the manufacturer's directions.

When finished, the sorbet will be quite soft and not scoopable. Pack it into a freezer container to let it firm up for at least 4 hours before serving. (Mine, in fact, was still quite liquidy after churning; there is no way it could have been scooped or served at that point. It firmed up well in the freezer, though. I froze it overnight.) The prepared sorbet can be kept, well covered, in the freezer for up to 3 months.


Citrus Shortbread Cookies

This recipe will yield about 2 to 3 dozen cookies, depending upon their size.

1/3 cup confectioners' sugar
zest of 1 lemon, chopped
zest of 1 orange, chopped
1/4 lb. of unsalted butter at room temperature (1 stick)
1 tsp. vanilla extract
1/2 tsp. salt
1 cup, plus 2 Tbsp., All Purpose flour (I used bleached)

Preheat your oven to 350 degrees. Line a cookie sheet with parchment paper.

In the bowl of your mixer, using the paddle attachment, mix together the sugar and the zests for 3 to 5 minutes.


Add in the butter and mix until creamed. Scrape down the bowl and the paddle, then add in the vanilla extract.


Mix just to combine. Add in the flour and salt, and again mix just until combined.


Gather up the dough and shape it into a round disk. (You do not need to chill it.)


On a floured surface, roll the dough out to a thickness of 1/4". (The book says to roll the dough to 1/8" inch, but I wanted my cookies to be slightly thicker and not completely crispy. If you want them thin and crisp, go with 1/8".) Dust off any excess flour, and cut the cookies into shapes using flour dusted cookie cutters.

Using a wide spatula, transfer the cookies onto your lined cookie sheet. Bake them just until the edges start to brown, about 10 to 15 minutes. Let them cool on the sheet.


Recipe Full Disclosure!
The sorbet recipe has been adapted from two recipes in Sherry Yard's book, The Secrets of Baking, 2003, Houghton Mifflin. The first one, for blackberry-Merlot sauce, is on page 285. The second one, for blackberry sorbet, appears on page 297; it incorporates the sauce as one ingredient. My main alteration included substituting a combination of raspberries and blueberries for the blackberries.
The citrus shortbread recipe comes from the book, The Olives Dessert Table, by Todd English, Paige Retus, and Sally Sampson (Simon & Schuster, 2000). I didn't alter that recipe, but adhered to the original.


(If you'd like to comment on this post, or to read any existing comments, click on the purple COMMENTS below!)