Showing posts with label berry pie. Show all posts

Wednesday, March 14, 2012

Bumbleberry Pie . . . for Pi Day 2012!


I don't know about you, but I always seem to miss Pi Day (03/14!). In the almost three years since I started this blog, I have never remembered to make a pie for the big day! Maybe it's because I'm no good at math? That's one theory. I had no real trouble until seventh grade, when geometry reared its ugly head. It was just too abstract for my liking, I guess, and things went down hill from there.


No wonder I took cover in books (pun intended) and eventually became an English major, who worked--predictably--in a college bookstore. Then I dabbled as a high school English teacher until I realized that wasn't where my heart lay, and then spent almost twenty years working in editorial departments for a publishing company. So, no math for me. Well, at least not the real scary kind.


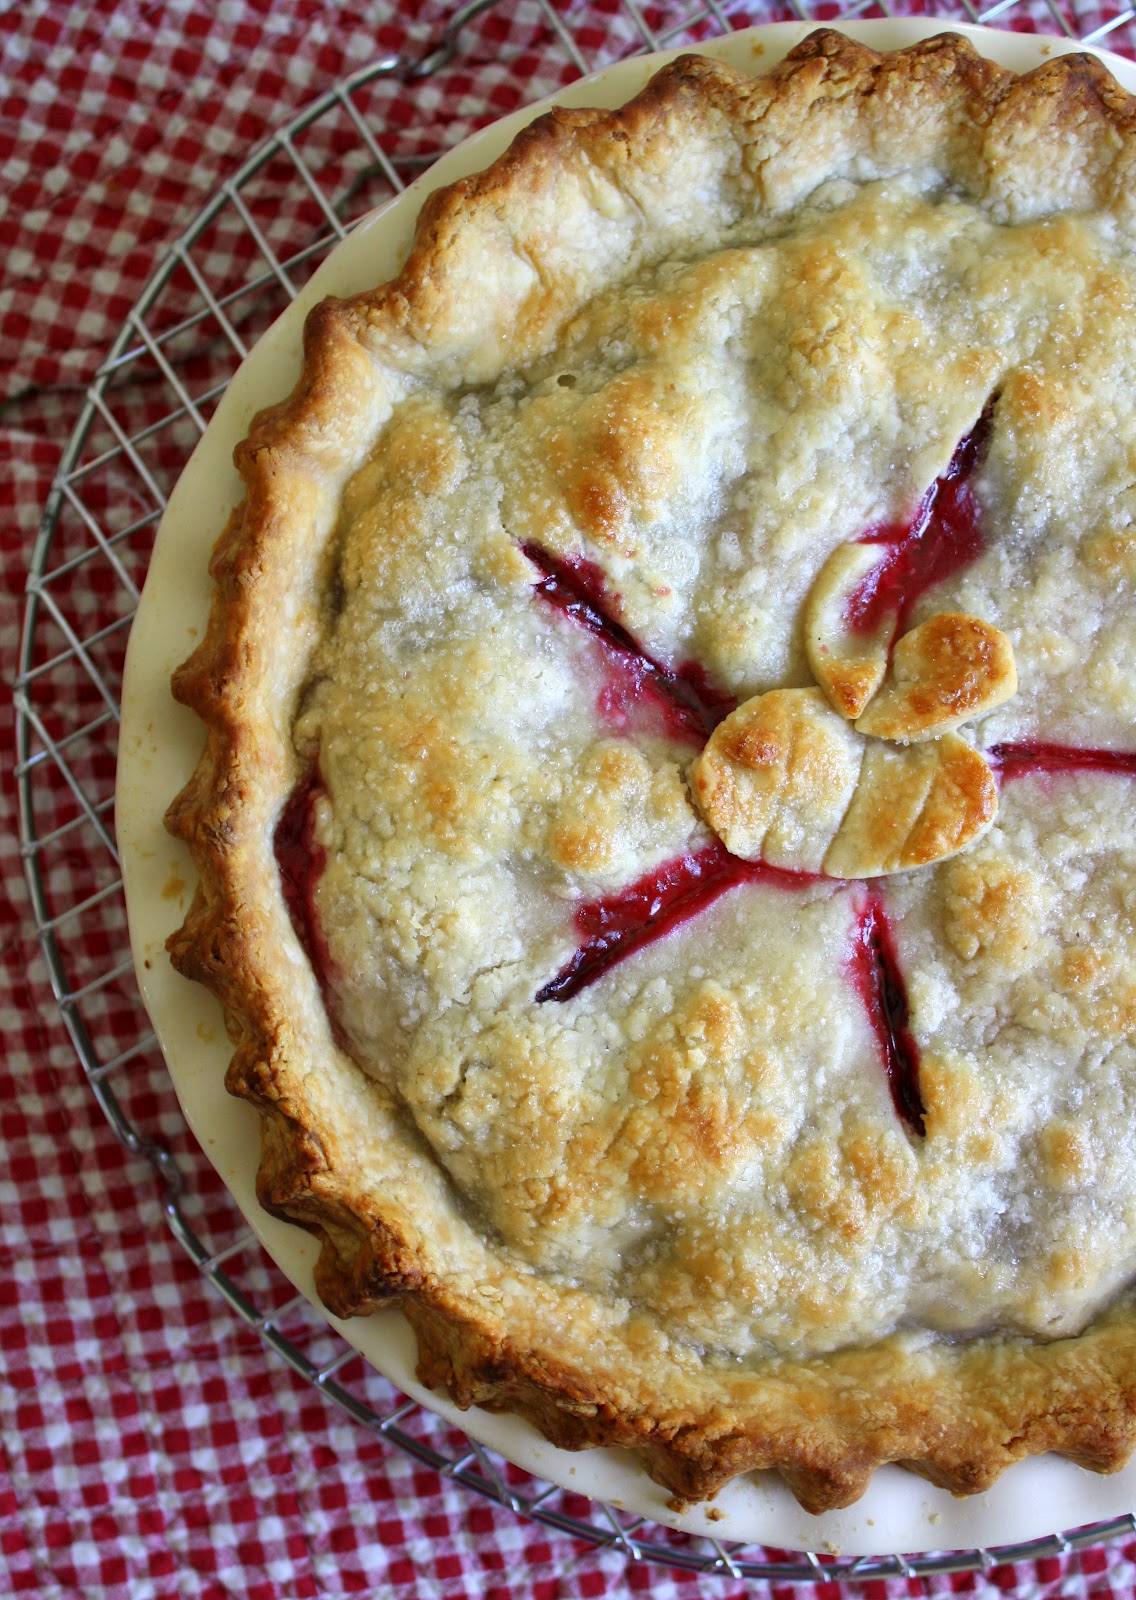
This year, though, I felt I should give Pi Day its due with a nice--what else!--pie, and it just so happened that I was already planning to make a bumbleberry pie when the special occasion conveniently rolled around. Thus we have today's treat--a bubbly, juicy, gorgeously fruit-packed dessert for all of you math lovers (and math haters) out there!


About this recipe . . . 

The crust recipe--a really good one and very reliable--came from Ken Haedrich's massive chunk of a book (over 600 pages), which is aptly titled Pie: 300 Tried-and-True Recipes for Delicious Homemade Pie. I have no doubt this volume is getting a heavy workout today in kitchens across the country.


The filling was pretty basic, so didn't require a formal recipe. I just cobbled it together based on my own past experience: thawed frozen Montmorency (sour) cherries (from northern Michigan, of course!), fresh blueberries, a few fresh blackberries, and one small, sweet, peeled Honeycrisp apple, chopped into small pieces. All of  it mixed with sugar, cornstarch, a pinch of cinnamon and nutmeg, and a splash of lemon juice. That's it! Too easy.


So what's a bumbleberry anyway, speaking of abstraction? There's no such thing! It just refers to a fruit-filling involving any assortment of berries, as well as apple and/or rhubarb.  What a great name for a pie! Bumble bees come from north and south to hover around these pies, as you can see (that little design I put on the top is supposed to be a bee . . . can you tell?).


Bumbleberry Pie
(For a printable version of this recipe, click here!)

For the crust: 

3 cups of all-purpose flour
1 Tbsp. granulated sugar
1 and 1/4 tsp.  salt (I used coarse kosher.)
1/2 cup unsalted butter, cold, cut into small chunks
1/2 cup vegetable shortening, cold, cut into small chunks
4 oz. very cold water

In the large bowl of a food processor, dump the flour, sugar, and salt. Pulse it a few times to mix it up. (You could certainly also make this dough by hand, using a pastry blender.)

Add in all of the butter pieces and pulse several times. Open the lid and use a fork to unclump the contents. Add in all the shortening and pulse several times. Open the lid again and unclump/fluff the contents with your fork. Now, drizzle 4 Tbsp. of the cold water all over the top. Pulse about six times. Drizzle in 4 more Tbsp. of the cold water and pulse again about six times. It should look crumbly, with chunks here and there the size of large peas. Gather a small bit in your fingers and squeeze it together. Does it hold together easily? If so, good. If not, drizzle a tiny bit more water and pulse again. When it's the proper texture (it should be not too sticky--too much water wrecks pie crust--and not too dry), dump it all out into a large bowl. With your hands, gather it all together into a big ball. Cut the ball in half almost evenly (the slightly larger part will be for the bottom crust), and shape each half into a disk about an inch high. Wrap each disk in plastic wrap and chill it for at least an hour, preferably longer (up to about 24 hours max) and, if you want to be on the safe side, mark them with the date/time you made them, and note which one is slightly larger (I write "top" and "bottom").

When you're ready to roll out your pie crust, take the disks out of the fridge and let them warm slightly for about twenty minutes or so. Flour your work surface, your rolling pin, and the dough disk you're about to roll out. Very lightly grease your pie plate with vegetable shortening. Roll the dough out so it's a couple of inches larger than the circumference of your pie plate. Transfer the rolled dough to the plate (I find it easiest to roll the crust loosely right onto my rolling pin and then unroll it directly onto the plate, but use whatever method works for you). If you'll be baking within half an hour or so, preheat the oven to 400 degrees. If it'll be more like an hour until you bake, refrigerate the  dough-lined pie plate.

To prepare the filling: 

4 cups frozen sour cherries, thawed and drained (I used Montmorency cherries.)
1 and 1/2 cups fresh blueberries
3/4 cup fresh blackberries
1 sweet apple, peeled and chopped into very small pieces (I used a very firm, medium-size, Honeycrisp.)
3 Tbsp. cornstarch
1/2 cup granulated sugar
1/4 tsp. ground cinnamon
1/8 tsp. ground nutmeg
1 Tbsp. fresh lemon juice
2 Tbsp. unsalted butter, room temperature

In a large bowl, place sour cherries, blueberries, blackberries, and apple pieces. Drizzle with lemon juice and toss gently to combine. In a small bowl, whisk together the sugar, cornstarch, cinnamon, and nutmeg. Scatter this over the fruit and stir gently to distribute it evenly. Set aside for about ten minutes.

When your oven is heated, and your pie is ready to be filled with fruit, pour all of the bumbleberry mixture into the shell. Dot the top with little pieces of unsalted butter. Roll out the top crust and place it over the fruit, sealing the edges firmly as you prefer (with your fingers, with the tines of a fork, etc.). Carefully cut a few steam vents/slits in the top. Brush the top of the crust lightly with milk (don't brush the edges of the pie; they're the first to darken) and sprinkle liberally with sanding sugar. Place the pie in the oven atop a baking sheet, or atop a piece of foil you've sprayed with vegetable spray (so it won't stick to your plate) to catch spills. Bake at 400 for about 25; check the pie and turn it around. If it's browning too fast, cover the top lightly with foil. Continue baking until the pie is golden, at least 15 to 20 more minutes. Lower the temperature to 375 if at any point you're worried about it burning.

Let the pie cool completely (or almost) before slicing.

(If you'd like to comment on this post, or to read any existing comments, please click on the purple COMMENTS below.)

Friday, June 12, 2009

Fresh Blueberry Pie . . . We Salute You!

Blue--what an incredible color. Blue ribbons, blue bonnets, blue suede shoes, blue moods, Marge Simpson's blue hairdo, the list just goes on and on. And blueberries . . . what a fabulous color for a fruit! I mean, how did nature ever come up with that? And how does one do justice to such an impressively blue fruit? How to honor it, pay it tribute, and appreciate it in all its indigo glory?

Bake it into a pie, of course. What berry wouldn't be proud to have a pie devoted to its very existence? No berry worth its juice, that's what berry.

I bought a few pints of blueberries this week for just such a purpose--a pie purpose, that is. It's been a while since I've made a blueberry pie out of fresh, vs. frozen, berries and my past attempts at fresh-berry pies have frequently yielded tasty but overly juicy results. That may not sound too bad, but in reality too much juice can turn the bottom crust into a spongy, soggy, non-crusty entity that is not attractive and that I do not like. So, in preparing to make this week's pie I figured I'd better try the method where you cook the fruit for a while to remove some of the moisture prior to putting it into the shell to bake. The recipe I used, just for the fruit filling, turned out to be a good one from King Arthur Flour. The only aspect of their formula that I changed was to decrease the recommended amount of cinnamon. Other than that, I think I adhered to the original pretty closely.

For the crust, I used my own adjusted version of a recipe for pate brisee that comes from the baking textbook About Professional Baking by Gail Sokol. I more or less doubled the recipe because I just like to have extra pie-crust dough available in the freezer. I reduced the amount of sugar indicated and I increased the salt. (Pate brisee's just a basic pastry/pie crust dough with a quaint French name. We should all have such quaint French names, don't you think?)

This is a crust recipe that's written to be used with a food processor, so that's what I used this time around. But I have to tell you that I am not fond of using this appliance for pie crust dough. Why? Well, I don't feel I have nearly as much control when I can't see into the bowl at all times and I can't just stick my hand in there whenever I want to. You see, I'm still into the joyous-though-primitive rapture of using a simple hand-held pastry blender for this task. Yes, I said joyous rapture. Call me crazy. Call me a cock-eyed optimist. I'm not a technology hater, I just like to have a close-up and personal relationship with my pie dough. I don't just like to, I need to, in order to feel like the dough is fully my own creation. I know I love my mixer, but I guess I only like my food processor. (There, it's out. I've said it. No turning back now.)


Fresh Blueberry Pie


For the fruit filling (enough for one 9" pie):

6 cups of fresh, ripe, firm blueberries that have been rinsed and lightly dried
1 cup granulated sugar
1/4 cup corn starch
1 tsp. lemon zest
2 Tbsp. lemon juice
1/4 tsp. cinnamon

Place all ingredients in a large sauce pan, stir together gently, and simmer until the mixture has thickened. This may take a good while, since you'll be simmering on low heat, so just be patient. Check it every now and then and give it a stir. Don't let it get so hot that it boils or it may become overly thick and gelatinous, like canned pie filling--not our goal! After it's thickened to your liking, remove it from the heat, set it aside, and let it cool to lukewarm.

(See, initially the liquid looks like pink gravy, as shown above. Then, as shown below, it eventually starts to look more like blueberry preserves.)


For the crust (this makes enough for two 9" double-crust pies; you can always freeze the extra dough):

3 1/2 cups AP flour, bleached
1 tsp. salt
1 cup cake flour
1 Tbsp. granulated sugar
1 lb. minus 2 Tbsp. (that's 3 sticks plus 6 Tbsp.) of unsalted butter, cut into smallish cubes and put in the freezer for about one hour
1 and 1/2 tsp. fresh lemon juice
3/4 cup ice water, plus more on hand if needed

Combine the two flours, sugar, and salt in the large bowl of a food processor. Pulse until well combined. (Or, do the whole kit and kaboodle by hand in a big bowl with your trusty pastry blender. That'll work too.)

Scatter the frozen butter cubes over the top of the flour. Pulse the food processor until the cubes are no smaller than peas.

Slowly add the lemon juice and half the water, pulsing just until combined. Continue adding more water until the dough holds together when you test it by pressing a bit of it in your hand.

When the dough seems ready to you, dump it into a large regular bowl, or onto a clean flat surface, so you can gather it all up into a ball.

Divide the ball into four equal parts, and shape each one into a flattened disk. Wrap all of the disks individually in plastic wrap and refrigerate two of them (if you're making one pie refrigerate two; freeze or refrigerate the other two for future use) for about an hour or more so the dough can rest. Pie dough needs to nap, you know. Makes the gluten calm and relaxed.

Preheat your oven to 425 degrees.

When you're ready to roll out your dough, do it on a lightly floured surface. Cold marble works great, if you have it, as does using a marble rolling pin (if you've never tried using cold marble you might want to consider it; it's unbelievable how much easier it makes the whole dough-rolling experience).

If you like, use your pie plate, flipped upside down, to help measure the size of the circle you'll need. Trim off the excess crust with scissors or a sharp knife.

Transfer the crust to your plate. (I like to fold the dough into quarters before moving it over to the pie plate. This is a really easy method if your dough is resilient and flexible enough to handle it.)
Spoon all of the lukewarm berry mixture into your pie shell.

Dot the top of the berries with a several tiny dabs of unsalted butter.

Roll out your top crust and transfer it to your pie. Crimp the edges however you like, and cut slits in the top of the dough for steam to escape. Brush the crust lightly with milk or cream, and liberally sprinkle sanding sugar (or granulated sugar) over the crust. Sanding sugar will give the top crust a cute rumply appearance after it's baked.

Put the pie on an old cookie sheet, or on foil, to catch juice leaks. Bake it for 15 minutes at 425 degrees. Then, turn the oven down to 350 degrees and continue baking for anywhere from 35 to 50 minutes, until the pie is light golden brown. Cover the edges of the top crust if they seem to be over-browning at any point along the way.

When the pie is done, take it out and cool it on a rack for at least a couple hours before cutting it. (If you can resist.)

This pie was a big hit in my house. My sixteen-year old son inhaled most of it. He's a tall, skinny lifeguard this summer and teenage lifeguards gotta eat!


(If you'd like to comment about this post, or read any existing comments, just click on the little purple COMMENTS word below!)