Showing posts with label cake decorating. Show all posts

Friday, December 10, 2010

Sam the Snowman Cake . . . from Rudolph!


One must have a mind of winter
To regard the frost and the boughs
Of the pine trees crusted with snow . . .

-- from The Snowman, a poem by Wallace Stevens
 
Before we get too much further into the Christmas season, I wanted to be sure and share this with you. It's my attempt at replicating, in cake form, the snowman from that favorite old TV special made in 1964, Rudolph the Red-Nosed Reindeer. I created it as my final-exam project for my Theme Cakes class, which ended in November. Since making this cake, I've come to the conclusion that just about every American under 75 must be a big fan of Sam the Snowman, the show's chubby narrator.


He's a pretty distinctive fellow, as far as snowmen go. Both wise and witty, he's possessed of a philosophical outlook not common to your typical garden-variety snowman. When he tells us to, "Pull up an iceberg and lend an ear," we're inclined to do just that. And isn't there something especially appealing about a dapper snowman who sounds just like Burl Ives?


I'm not going to confess exactly how long it took me to work on this cake, all in all, nor how much  fretting I did in preparation for assembling it. Needless to say, the process was time consuming for me and fraught with potential pitfalls. That's because this kind of cake--one requiring quite a bit of advance planning, not to mention structural support and anchoring--is still pretty new for me. I was more relieved than I can convey when the finishing touches were completed on the last day of class.


You know how it is when you work on something that requires you to immerse yourself in its every detail? You become acutely aware of the finished product's imperfections and those are what you tend to focus on. That's how I felt, initially at least, when this cake was done and largely why I was stunned when my teacher and fellow students liked it so much.


Chef Lois, my teacher, asked me if she could keep the cake to display it at a couple of upcoming culinary-school sponsored events. I was pretty flattered by this. She suggested that I first take it home to show to my husband and kids (who'd been hearing me fuss about it for at least a couple of weeks) and then bring it back to school. So that's what I did.


Thankfully, it was a very successful project all in all, and Sam turned out to be a pretty fun character to try and depict in cake. For those of you who want to know how this cake was created, click here for the gory details. For those of you who become nauseous or disoriented at the mere thought of making something like this, you have my sympathy. I'll understand completely if you need to stop reading right now. Yes, you may be excused. Go bake some cookies instead . . . or get a start on wrapping those presents!


(If you'd like to comment on this post, or to read any existing comments, please click on the purple COMMENTS below!)

Thursday, October 28, 2010

The Cake that Thinks it's a Pumpkin . . . Happy Halloween Pumpkin Cake!


Happy Halloween to all you scary, spooky bakers out there. Can you guys believe it's already the end of October? Holy moly, huh? Before you know it we'll be haulin' out the holly (gulp). But never mind about that. Before the calendar advances any further, I just wanted to share with you my contribution to the current spooky festivities. We made these cakes in my Theme Cakes class this week.


Decked out like a pumpkin, complete with curling tendrils , fallen leaves, and acorns, this is a relatively simple cake to construct and decorate. While entirely edible, only the cake itself would be appealing to eat; the little decorations are made of fondant that's been allowed to harden, and then been airbrushed to enhance the colors.


The cake itself is made up of three thick 9" round yellow layers. You can make this easily by combining two cake mixes (forgive me, Gods of from-scratch baking--I swear I only use them for my cake decorating class!), one plain yellow cake and one pound cake (I think Duncan Hines works best). The pound cake gives the cake a firmer texture, and that makes it carvable--a critical quality for a cake like this.

How was this all accomplished? It's really not too complicated. Here's how to make your own:
  • Set the bottom 9" cake layer on top of a cake-board (a round of corrugated cardboard) that is 2" smaller than the cake itself. Put that on a cake decorating turntable. Ice the top of the bottom layer. Put on the next layer and ice the top of that. (We just used plain white buttercream.) Put the third layer on top of that, but don't ice it.
  • Then, trim the top outside edge of the top layer, and the bottom outside edge of the bottom layer, carefully with a sharp paring knife in order to make the whole thing look somewhat rounded. 
  • Now ice the outside of the entire cake with one "crumb coat" of orange buttercream then, keeping the whole cake on the turntable if possible, chill the cake in the fridge. When that coat of icing is firm, then lay on a thick final coat (we used vanilla-flavored, but orange-colored, buttercream) of  icing. (We applied both coats of icing using a pastry bag with a large round tip; you start at the bottom and pipe fat stripes of icing upward to the stem area, then after each coat is piped you smooth the stripes down with a spatula. This just allows you to more evenly distribute the icing all over the cake with less angst--it's the easiest way.)
  • Now, cut a simple little tool made from a firm but flexible piece of thin plastic. It should look like a bat's wing with only two scallops cut out. We just cut ours from the lid of a clear plastic food container (make sure not to make the outer corners too pointy or they'll cut too deeply into the icing). This is used to carve the curved grooves in the pumpkin's surface. Starting at the bottom of the pumpkin, gently curve the piece upward, pressing it slightly into the icing surface. Swipe it all the way to the top of the pumpkin where the stem would go. Wipe off the plastic after every single swipe. Proceed until the whole thing is shaped as you wish.
  • If you have access to a cake-decorating airbrush, know how to use it, and want to add some dimension to the cake with color, you're golden. If not, don't worry about it. You already have a very pretty orange pumpkin cake! You can easily create a stem from fondant that you color green or brown, if you like, or just use something else for the stem. Those little fondant leaves are really easy too (you can use a special fondant cutter for those; all of this fondant related stuff is easily accessible at places like JoAnne's or Michael's craft stores--just check out the cake decorating aisle). Definitely make the fondant items ahead of time (days ahead of time is fine) so they can firm up before you need to use them on the cake.

    Don't be too fear-filled to try this. Like Halloween itself, cake decorating is meant to be enjoyable, and this was a really fun cake to create.

    Have a wickedly tasty Halloween!


    (If you'd like to comment on this post, or to read any existing comments, just click on the purple COMMENTS below!)

    Friday, October 1, 2010

    The Elmo Cake . . . Fat, Furry, and Skewered


    Well, despite my best intentions, I really didn't have enough time to bake anything fantastic or unique this past week. (Appalling, I know.) But, I just couldn't end the week without sharing at least something with you. As you may already know, I'm a part-time student in a baking and pastry arts program. I'm about halfway through the program and, overall, I must say that I love it. I keep learning such interesting new stuff.


    This semester, I have two classes. One is called Pastry I, the first serious pastry related course, and the other is an intermediate cake decorating class called, appropriately enough, Theme Cakes. So far, our work in the latter has focused on cakes for kids, particularly those requiring 3-D "sculpture" of one kind or another.

    This past week's cake creation featured a chubby, furry, wide-eyed Elmo. That's Elmo of Sesame Street fame, in case there's any confusion. Yes, as you can plainly see he's looking quite plump, perched comfortably atop a very tall 2-layer cake, iced in soft buttercream. My husband, at first glimpse from the back of the cake, thought for a moment that Elmo was some sort of hefty bear. Couldn't blame him. That little dude's sporting more fur than Big Foot. Though you might not want to eat him, you could safely do so without coming to any significant harm. Except maybe a belly ache.

     
    He's not exactly what I'd call a marvel of engineering but, for a novice like me, this fact is reassuring from the cake construction standpoint. His torso and head are indeed made of cake, while his arms were shaped out of homemade Rice Krispie treats. His legs are made from marshmallows trimmed this way and that. His eyes, nose, and mouth are fondant. The gift boxes on the cake are made from Rice Krispie treats too, covered in fondant, while the letters and numbers on the side are also fondant.

    This is the first cake I've ever worked on that required a long skewer be twisted into it, all the way down into the base (which--in case you're actually interested in this kind of stuff--consists of a royal-icing covered 1" styrofoam disk that was glued atop four layers of corrugated cardboard that were taped together). The skewer, in fact, impales Elmo right through the top of his melon and holds him securely in place. Doing this was kind of nerve-wracking but my teacher, bless her heart, was guiding me every inch of the way: "Turn the skewer slowly like a screw while you push it down. You have to screw it in."

    Uh huh. I skewered Elmo.
     
    Oh, and before I forget, this post was brought to you by the letters C-A-K-E.


    (If you'd like to comment on this post, or to read existing comments, please click on the purple COMMENTS below!)

    Thursday, August 5, 2010

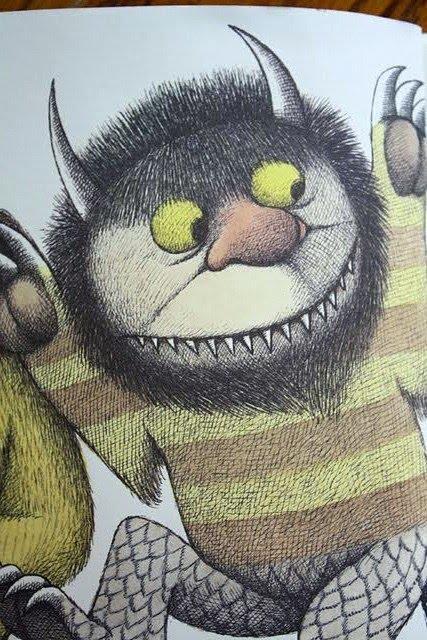
    Where the Wild Cakes Are . . .


    "The night Max wore his wolf suit and made mischief of one kind and another his mother called him 'WILD THING!' and Max said 'I'LL EAT YOU UP!' " -- Maurice Sendak, Where the Wild Things Are

    A few weeks ago, my good friend Holly asked if I'd be interested in making a special cake for her young nephew's birthday party. She sent me a link to a photo that depicted a fun rendition, in cake form, of one of the characters from Where the Wild Things Are. I took one look and knew I couldn't pass it up. That photo provided the direct inspiration for the cake that I ended up making last week. I hope the folks at Coco Cake, a boutique-cupcake bakery in Vancouver, Canada, agree that imitation is the sincerest form of flattery, because I drew very heavily from their adorable design (click on that link to see their cake!).


    Their cake, though, was fondant covered and wrapped with a fabric ribbon. Because we didn't want to go with fondant for this little boy's birthday, my cake was filled and coated with buttercream, and fondant accents were used only for the eyes, nose, teeth, and horns. To make this cake, I used a devil's food recipe that can be found here, in a post that I did last September; the buttercream icing recipe that I used can also be found within that same post.

    This is an awfully simple design when you get right down to it. Anyone with the time and inclination could make this. So, let the wild baker within you out -- make your own Wild Thing cake, and let the wild rumpus start!


    Here's the rundown on the supplies that I used and details on how I assembled this wild thing of a birthday cake:

    Three 9" cake layers, cooled
    About 1 and 1/2 cups of white or off-white buttercream icing
    About 5 cups of chocolate icing
    About 3/4 cup of grated milk chocolate and dark chocolate, combined
    A small amount of white fondant (teeth and horns)
    A small amount of pinkish/flesh-toned fondant (nose)
    A very small amount of bright yellow fondant (eyes)
    A very tiny amount of black fondant (pupils of eyes)

    Helpful to have:
    One 9" cakeboard
    Cake decorating turntable
    Metal offset spatula(s)

    You'll definitely need:
    One pastry bag (10" or 12" size is good)
    One decorating tip -- number 133 or 233 (these are often referred to as "fur" or "grass" tips)
    4 sharply-pointed standard length toothpicks (to help anchor the horns)
    Black or dark gray food coloring (preferably paste or gel type; not the watery type)

    Assembly:
    With one layer of the cake placed on the 9" cakeboard (note: "glue" the layer onto the board with about a tablespoon of smeared frosting on the board itself), and centered on your turntable, spread about 1 cup of the chocolate icing evenly to the edge of the layer; do the same with the second cake layer, spreading the icing evenly to the edge. Over the third layer, spread half of the white icing smoothly. Now, ice the sides of the cake all in chocolate, smoothing as you go; while the frosting is still soft, lift the cake on its board, and holding it on your palm over a sheet pan, pour and pat the grated chocolate onto the sides until the cake is coated all around. This grated chocolate gives the cake a nice furry look--very wild! Try hard to avoid getting grated chocolate on the top of the cake.


    Refrigerate the cake, uncovered, for about 20 minutes or until the frosting on the top feels cold and firm. Once it's firm, spread another layer of white icing over the existing layer on the top of the cake. Smooth it completely with an offset spatula; if you're having trouble getting a really smooth surface, it helps to dip your spatula in very hot water for several seconds, immediately wipe it off with a dish towel, and then use it right away to smooth out the buttercream (they call this the "hot knife method"-- how clever!). Refrigerate the cake again, uncovered, while you prepare your fondant decorations.

    When working with fondant, always remember that it begins to dry out extremely quickly, so don't leave it exposed to the air. Lightly cover your fondant pieces that are in progress with a slightly damp piece of paper towel while you're working, and only remove as much fondant from the container as you'll need for each decorative piece as you shape each one. (Keep your containers tightly closed and/or in zip-loc bags. You can buy small containers/packages of fondant at craft stores. They can be purchased already colored, or you can buy white fondant and color it yourself with paste food coloring; if you've never used fondant before at all, though,  practice with it before you actually try it out on an important cake. It's kind of a weird medium and it takes getting used to. In fact, if you're a total newbie, I'd advise reading up on basic fondant techniques just to help avoid disaster.)


    Working the pink/flesh-tone fondant with your hands until it's relatively soft, shape it into a rounded cone/pyramid shape, and work that gradually into the shape of the creature's nose. Don't forget that it needs one flat side to lay on the cake, and two indentations that look like nostrils. Keep in mind, as you mold the nose, the desired size in relation to the top of the cake.

    To make the eyes, roll out the softened yellow fondant with a fondant rolling pin (a waxy, extremely smooth pin), and cut out two perfectly round eyes. Don't make them too thin, or they'll be hard to cleanly lift and handle. Roll out and cut two very thin circles for the pupils, and then trim them to fit into the eyes. Attach the black pupils to the eyes by dabbing on a tiny bit of water, with your finger or a brush, to act as glue; water is all that's needed to cement two small pieces of fondant together.

    For the teeth, roll out a bit of the softened white fondant and. using a sharp knife or pastry wheel, cut out about 10 triangular teeth. (That wild creature really has 14 teeth in the storybook, but I could realistically only fit 10 of my fondant teeth on the cake.)

    Take a larger chunk of the white fondant and roll it into a solid cone shape, then curve it slightly to make it look like the creature's horn; make 2 of these. At the base of each horn slice off a bit of the fondant on an angle with a thin sharp knife, to help create a small flat surface that will allow the horns to rest on, and better adhere to, the frosting on the cake. Let the horns sit for a while and firm up before attempting to affix them to the cake. Don't cover them.

    Remove the cake from the fridge. Handling each fondant item carefully, arrange the eyes, nose, and teeth on the top of the cake, keeping in mind as you place them that frosting "fur" will eventually be piped all around the edge of the face.


    When the horns seem firm enough, position them near the top edge of the cake above the outer edges of the eyes. Anchor each one, at its base, into the cake by pushing the two toothpicks through the horn and into the cake. (Critical: Be sure to inform the person who will be cutting the cake that the toothpicks are in there! No one wants a birthday child biting into a toothpick!) If there's any fear that the horns aren't ready to support themselves, place something beneath them to help hold them up while you continue decorating the cake. (As shown, I needed to use little boxes that I topped with folded napkins. That worked well, and once the whole cake was done being decorated and could go right into the fridge, I removed the supports and all was well.)


    Prepare your pastry bag, using the fur/grass tip in a coupler (the coupler is the two-piece device that holds the tip securely inside and outside of the pastry bag). Using a small spatula or the back of a spoon, "stripe" the inside surface of the bag here and there with a smearing of the black/gray food coloring. Now fill the bag about 2/3 of the way full with soft chocolate frosting; it must be soft enough to pipe easily but not at all warm; if it's too soft the fur will just flop over and make a mess as you pipe it onto the cake.


    Starting with the toothpick-anchored horns, pipe fur all around them; this will anchor them further.


    Then, pipe the long bangs that extend to the top of the nose and eyes. From there, just keep piping fur all around, refilling your bag with more frosting as needed. Make the piping a little heavier near the creature's chin; in the book, he has a bit of a goatee if you look closely. Once you're all done piping, store the cake in a plastic cake carrier, or in a cake box, in the fridge.

     There now, wasn't that wild? 

     
    (If you'd like to comment on this post, or to read existing comments, please click on the purple COMMENTS below!)

    Wednesday, October 7, 2009

    More Cake-Decorating Angst: Mea Culpa, Mea Culpa . . .

    Okay, so I know I whined to you about cake decorating mishaps in another post just this past August, but now I think I've pretty well topped myself. The cake-wreck you see here is not the stuff of nightmares. No, my friends, it is all too real. Yes, it really happened. To me. Today. In my cake decorating class, more or less in front of all my fellow students (though I hope they were all so concerned with their own cakes that they paid no attention to what I was doing).

    The disaster in a nutshell . . . We were all required to frost a tall, round layer-cake with the "basketweave" piping technique (very pretty, normally). And, we had to use a whole bunch of royal icing flowers we'd made in class last week--thus the excessive amount of decoration you see on the cake. It was not the stuff on top of the cake, though, that caused this project of mine to be a complete debacle. It was the consistency of the frosting on the sides. The worst part is that it was a frosting situation was of my own doing. Mea culpa! I am guilty. Oh woe is me.

    (Note the lower left side of the cake in the picture above. . . I think its tectonic plates had pretty well shifted by the time I took this. Where's a Richter scale when you need one?)

    I wrote all about the disaster an hour or two ago in my latest "Diary of a 48-Year Old Rookie Culinary Student" entry, a regularly updated sidebar that can be found on the right side of my blog (just look for the photo of the white chef's hat and click on it, if you ever want to read the details of this latest tragedy, along with any past diary entries).

    I know full well that a cake catastrophe has no significance in contrast to most of our problems, but I didn't want to hide it from my fellow bakers. Afterall, it's yet another cautionary baking-tale, is it not? Another one for me, at least, to add to my arsenal of hubris and folly. Maybe, though, somebody will learn from my folly . . . I know already have.

    The moral of the story is this . . . Always keep in mind how long your mostly-butter-based frosting is going to have to sit around in an overcrowded room with no refrigeration before you embark on a cake decorating project, and if you think there's any cause for concern, for heaven's sake just bite the bullet--use a reliably stable frosting. Don't function as if you know more than your current teacher, and more than your past teachers. (Luckily for me, my teacher couldn't have been nicer or more understanding. She did what she could to help me avert complete humiliation, bless her heart, but she's not a magician.)


    Aesthetic Disclaimer . . .
    Please note that the color palate you see here is not of my own choosing. I feel compelled to explain that because I'm more of a subdued-frosting girl. We were all required to use these same bright and autumnal colors. And, that butterfly was just our class's first attempt at using the technique called color-flow. I think his less-than-Monarch-like color scheme is pretty unattractive myself, but it was fun learning how to make him. It was very fun, in fact, learning to make all of the flowers. Despite today's uncomfortable setback, I still love cake decorating. Nothing will ever change that, I'm sure.

    (If you'd like to comment on this post, or read any existing comments, click on the purple COMMENTS below!)

    Saturday, August 8, 2009

    Cake Decorating Angst: Coming Clean . . .

    I spent a hefty chunk of the first half of last week working on a couple of big cakes. They were commissioned by a very good friend of mine named Patti, who I've known since 3rd grade. I was happy to agree to make them, and flattered to be asked. The order was for two half-sheet layer-cakes for her mom's 80th birthday party. I could be wrong about this, but I'm pretty sure she told me they might need to serve up to 80 people. No problem, I figured. It's good practice to make cakes, or any baked goods for that matter, that you know from the get-go will be leaving your house and venturing out for a public showing. Kind of scary, but good practice nonetheless.

    But, let's be honest. For a complete amateur like me, a large and even moderately decorated cake that's designed for public exposure presents a challenge from several perspectives. Big cakes involve planning, purchasing, scheduling, and executing, not to mention a healthy dose of fretting. I pondered whether or not to blog about these cakes. "What if they don't turn out looking nice enough? What if they look downright pathetically amateurish?" Those were my thoughts. Thus encumbered by that rather defeatist attitude, I took very few photos when I was working on them and I didn't document any of the glitches along the way.

    In hindsight, a few days after the fact, I realized that was an extremely silly and childish posture to take. In fact, an inauthentic attitude. Afterall, I'm not masquerading as an expert baker or a bona fide pastry chef--though I aspire in my wildest dreams to become the latter someday--so, really, what's to fear? The only folks who read my blog are people who like to bake too and they all seem pretty darn supportive and understanding. Heck, I'm just another middle-aged American female who's crazy about baking and all it entails. Warts and all, I should just shut-up and blog about it, right? Right.

    Okay. So here I go.

    I made a white two-layer cake with a fluffy raspberry flavored buttercream frosting, and a dark chocolate two-layer cake with two kinds of chocolate buttercream. All (of course!) completely from scratch. A half-sheet is technically 11" by 15" inches, but in reality, frosted and on its board(s), then put in its box, a cake that size is considerably bigger than 11" by 15". And, filled and frosted, that's potentially a pretty heavy cake. You'd better lay in a liberal supply of butter, eggs, sugar, flour, and confectioner's sugar, if you're contemplating making two of these babies.

    Now, the baking part itself for a big home-baked cake seems simple, on the surface, yes? Just select a highly reliable recipe, scale your recipe upward, and take into account your mixer's capacity. With a larger than normal cake, though, there are a number of additional factors to take into account in order to grease the wheels of the whole process and help evade potential catastrophe. You benefit by having a few pieces of special equipment on hand (pretty much all of which, luckily, I already had in my ever-growing arsenal).

    It's a good idea to have items like large-size pans of better than average quality (the pans I used were the brand called Fat Daddio--made of anodized aluminum, they are exceptional); one or two heating cores to help with even heat distribution (a cone-shaped metal cup that gets filled halfway with batter and sits in the center of the batter-filled pan; after the cake is baked, the hole created by the core is then supposed to be perfectly "plugged" with the cake that baked within the core); cake-strips (metallic-looking thick cloth strips that you soak in water and then strap around the outside of your pans to help produce a smooth and even cake surface); large cooling racks; cardboard cake-boards of the right size (one or two exactly the size of the cake, and one or two a couple of inches larger than the cake); a large-sized cake leveler (I expect professional bakers wouldn't be caught dead bothering with this hack-saw-like tool, but I'm unashamed to admit that I think these are incredibly helpful at creating evenly sliced layers); offset spatulas of different lengths and sizes; pastry bags of various sizes; an assortment of metal decorating tips, along with a few plastic couplers to attach them to the pastry bags; a clean, new, bakery box that will accommodate the finished cake; decorative foil or some other type of covering, if you choose, for the larger cake board that will be visible, and so on and so forth. Just about the only thing I didn't end up using was a turntable, which seems to me kind of useless with a huge rectangular cake, though they are indispensable with round cakes. Not unlike the accoutrements of just about any beloved hobby, the tools required for cake baking and decorating--not to mention the tools simply desired--tend to accumulate steadily and benignly if not reined in, like a profusion of dust bunnies under the bed.

    The worst problem I experienced with one of the cakes was completely my own fault. When I put the heating core into the pan with the white cake batter just before baking, I FORGOT TO FILL IT WITH BATTER!! This meant that when I checked on the cake about 20 minutes into baking, what I saw was a tall, metal, tipped-over cup right in the middle of the cake, like a skyscraper above the horizon that had been toppled by an earthquake. I was so horrified at that point that I almost burst into tears. It was late afternoon, I was getting tired, and I'd been baking and caking all day. What was I going to do? Should I leave the core in there and let the cake finish baking? Should I try to take it out and hope the cake magically repairs itself? With utter dismay, I weighed the options. I ended up leaving it in, but I immediately started making a tiny bit more batter in order to be able to patch the bizarre indentation that was left by the heating core. Everything worked out okay in the end, but boy did I feel like a cake-bakin' failure for the first few minutes after I opened that oven.

    So, eventually the two cakes were cooled, and "torted" (split and filled), and ready to be decorated. Given the time constraints I imposed on myself for Patti's cakes, I thought it was too risky by far for me to suddenly try decorating techniques I wasn't too familiar with. I played it safe and just did some roses for the white cake. Eight roses, one for each decade of the birthday lady's life, and one little rose for good luck in her future years. I had no end of trouble, though, making buttercream roses that would hold up because of the hot humid weather, so in dismay I ended up resorting to making royal-icing roses. This was poor planning on my part. Royal icing gets firm, kind of like candy--you really can't cut through it with a knife. It was not my preferred option, but what's a girl to do? Aside from that, the only other trick I had up my sleeve was basic piping--oh, you know, shell borders, reverse shell borders, dots, writing, and so on--nothing you don't learn in a rudimentary cake decorating class. And I piped a few dark chocolate butterflies that turned out sort of okay; a couple of them were a last minute addition to the chocolate cake.

    I'm glad I made those Size XL cakes, don't get me wrong. And, I already knew this, of course, but the point was driven home to me even more so as I worked on them: To produce cake decorating that's actually beautiful takes continual practice. It's a skill that doesn't lend itself well to sporadic bursts of activity followed by long stretches of no activity at all. The fact is, it had been months since I'd even made any frosting roses. I think cake decorating well is less akin to riding a bicycle than it is to playing a musical instrument. Anyone can get on a bike after a few years and still do it. Afterall, not much technique is required to use a bike. But if you pick up a violin after a few years of not playing . . . well, you'll probably remember where to place your fingers on the strings, but what comes out ain't gonna sound much like music (I know this first hand as well, and the violin in my bedroom closet can attest to it).

    Anyway, readers, going forward I vow to try and be more willing to document both the bitter and the sweet when it comes to my less than stellar baking adventures. My next special-cake mandate comes to me from my husband. He's holding his annual poker tournament in September and wants something poker-themed for that event. We're still tossing around ideas. A couple of slightly overlapping playing cards? We'll see . . . that sounds doable . . . just as long as they're not face cards!


    (If you'd like to comment on this post or read any existing comments, click on the purple COMMENTS below!)