Showing posts with label artisan bread. Show all posts

Thursday, February 3, 2011

Chive-Speckled Potato Bread with Winter Vegetable Soup . . . This is Snow Day Food!


Wonder of wonders! A snow day that came complete with prior notice. I don't believe that's ever happened around here before. Days like that are such a nice respite, dropping into our laps like found money, no strings attached. They quiet the world down.


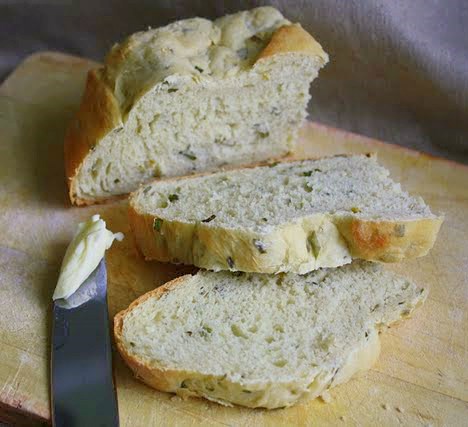
No school for anyone, not even me! So, instead of fretting over the construction of a sugary delicacy in my Plated Desserts class yesterday, I relished the luxury of slicing, dicing, stirring, and whirring a big pot of  winter vegetable soup in my own little kitchen. Served up with a generous slice of the moist, chive-speckled potato bread that I'd baked up on Tuesday night, and all was right with the snow-blanketed world.


Whatever our age, snow days release us from our most cumbersome daily responsibilities, if only briefly. It did my heart good to know that my 17-year old son, Charlie, spent much of the day outside, sledding with a pack of his friends. He's on the swim team at his high school, so he doesn't get to do all that much these days aside from schoolwork and swimming. Often he's out the door and on his way to the pool by 5:30 in the morning to swim before classes start, then the team swims again after school until about dinner time. A long night's sleep is a pretty rare commodity for him, let alone the time to spend almost an entire day outside. He reveled in the break from routine.


Meanwhile, Nathan, my 14-year old, spent a few hours of his own on another local slope with a couple of his pals. Dropping them all off at the neighborhood park, it was cute to witness these man-sized boys ultra-bundled and pulling plastic sleds behind them. When Nathan finally walked in the door last night around 7pm, his cheeks were as pink as a four year old's and he looked just as carefree. (He'll chastise me if he ever reads that, but I'll take the chance.) I hope my kids never conclude that they're too grown-up to play in the snow.


About these recipes . . .

This bread recipe is adapted from one I found on The Fresh Loaf, which is one of the most useful blogs around for  amateur bread bakers. If you have a bread question of any kind, chances are the answer lurks within that site.


Really good, this loaf gets its moistness from a small amount of baked, and then mashed, russet potato, along with a dollop of sour cream and a handful of chopped fresh chives. The original recipe called for use of an unpeeled red potato, but I used a peeled russet potato instead. The original also indicated adding in chopped cooked bacon along with some of the bacon fat, but I left that out entirely. I revised the instructions to reflect what I actually did.


The soup's secret flavor-weapon is the addition of a semi-sweet Riesling; a cup of the white wine is poured in after chopped shallots and garlic have softened in a smidgen of butter in the pot, and before all of the vegetables and broth are added in and brought to an intense and lengthy simmer.


Once all the veggies are tender, the soup is almost fully pureed with an immersion blender, with as many chunky bits left in there as you please. Season the soup to suit your taste, and you're all set. (My adaptation of the soup is based upon a recipe that can be found at this link. I revised the instructions to reflect what I actually did when making my version of the soup.)


Russet Potato Bread with Fresh Chives

(For a printable version of this recipe, click here!)

This recipe made one large round loaf, which I baked on a baking stone.  

Bake one medium-sized russet potato. When it's cool enough, scoop out the insides and set aside. You can discard the skin. Mash 1/2 cup of the cooled potato.

Ingredients for the bread:
1/2 cup mashed russet potato
3 to 4 cups All Purpose flour
3/4 cup water, lukewarm
1/2 cup sour cream
2 tsp. instant yeast (I buy mine from King Arthur Flour or from a health food store. I've come to really prefer it over active dry yeast. I love that you don't have to proof it first.)
1 tsp. salt (I used 1 and 1/4 tsp. coarse kosher salt)
1/2 cup fresh chives, chopped small

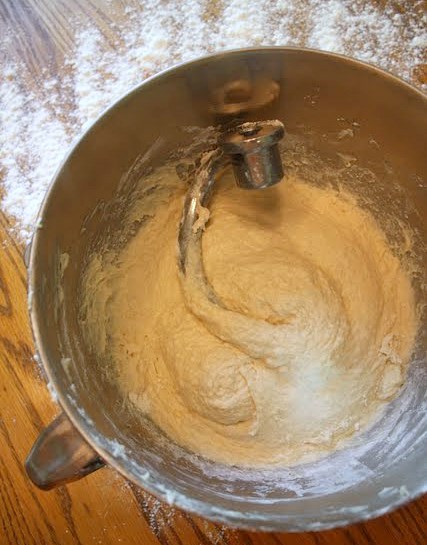
In the large bowl of your mixer, using the paddle attachment, combine the mashed potato, 2 cups of the flour, the yeast, and the salt. Add in the water, sour cream, and chopped chives. Mixing on low speed, add in the remaining flour a little at a time over a couple of minutes. The dough will be sticky. Turn the dough out onto a well floured work surface and knead it with your hands until it forms a fairly smooth mass. If your dough is extremely sticky, work in more flour; if it's a drier dough, minimize the amount of flour you use for kneading.


Put the dough into a lightly oiled bowl, turning it over so it's oiled on all sides. Cover it with plastic wrap that's also been oiled or sprayed with vegetable spray, so the dough won't stick to it. Cover that with a dish towel and place the bowl in a relatively warm spot to rise. Let it rise until it's about doubled. That may take up to 90 minutes.

Turn the risen dough out onto a lightly floured surface and press it firmly with your knuckles to remove the gas. Pick up the dough and round it, gently pulling downward on the sides to create surface tension. Let the dough rest for 10 to 15 minutes on the work surface, lightly covered with the plastic wrap from your bowl.

Prepare a basket/bowl for the final proofing. I used a shallow metal mixing bowl, in which I placed a couche (a piece of heavy linen fabric, specially designed for proofing dough; you can approximate this with a big, non-fuzzy, cotton/linen dish towel) that had been very heavily dusted with flour.

Once the dough is done resting and it feels relaxed and no longer resistant to shaping, shape it into a smooth round mass and seal the bottom seam by pinching it closed tightly with your fingertips. Place the dough seam side down into the flour-lined couche in the bowl/basket.


Cover the dough lightly with the oiled plastic wrap and gently lay the side flaps of the cloche over that. Let the dough proof until it's doubled in size, perhaps 45 minutes to 1 hour. Preheat the oven to 425 and, if you're using a baking stone, place it in the oven now so it has plenty of time to preheat.

If you're not using a baking stone, you'll need a parchment lined baking sheet.

When the dough has doubled, lift it very carefully out of the couche, and place it onto a flour dusted baker's peel (use the peel if you're going to be putting it on a hot baking stone), or directly onto the parchment lined baking sheet. Spritz the top of the dough lightly with water (this will help prevent it from bursting while it bakes). Slide it onto the heated stone, if you're using one. Spritz water into the oven very quickly from a spray bottle to create moisture--just a few brief squeezes, then shut the door gently.

Let the bread bake at 425 for only 5 minutes, then turn the oven down to 350 for the remainder of the bake time. The bread may take about half an hour to bake. It should be golden and its internal temperature, in the center of the loaf, should reach about 195 on an instant-read thermometer. Let the finished loaf cool on a rack.


Winter Vegetable Soup
(For a printable version of this recipe, click here!)

1/2 of one medium size green cabbage, shredded or chopped
1 medium size turnip, peeled and chopped into small pieces
4 medium carrots, peeled and chopped into small pieces
4 stalks of celery, cleaned and cut into small pieces
1 medium size potato (I used an unpeeled russet)
1 small handful of chopped, fresh, flat-leaf parsley
1 extra large shallot or 2 medium shallots, peeled and finely chopped
1 medium clove of garlic, peeled and minced
3 Tbsp. unsalted butter
1 cup Riesling or other semi-sweet white wine
2 quarts of vegetable stock (I made some using water mixed with Better Than Bouillon vegetable base; another nice choice is Kitchen Basics vegetable stock, especially if you're concerned about the sodium aspect.)
1/2 cup half & half (optional)
kosher salt to taste
fresh ground black pepper to taste
Dijon mustard to taste


Melt the butter in a large stock pot. Add in the shallots and garlic and simmer until they're translucent. Pour in the wine and simmer for about 15 minutes. Add in all the chopped veggies, and the parsley, along with the broth. Let the soup simmer on medium heat until all the vegetables are tender; it could be at least an hour. Turn off the fire. Using an immersion blender, puree the soup in its pot until it's got a minimal amount of chunks left. Add in, if you prefer, about 1/2 a cup of half and half to make a richer soup. Add in salt and pepper to taste.

Serve with your fresh bread and enjoy!

(If you'd like to comment on this post, or to read any existing comments, just click on the purple COMMENTS below!)

Friday, October 8, 2010

Leave the Bagel . . . Take the Bialy!


Like almost everyone else in the world, I've never had anything that could truly be called a genuine bialy. Oh sure, I've tried the big puffy things sold in some bakeries and grocery stores that are labeled with the name but, unsurprisingly, those are sorry pretenders. Of course, my situation in this respect is not at all unique.


Why is that so? Because bialys--the real ones--exist today only in the fading memories of a few individuals. According to food writer Mimi Sheraton, who spent years traveling from country to country in her quest to uncover and document the culinary and social history of the bialy, this is true because the specialized culture that originally produced them disappeared into the mist of time. It vanished not by choice but, sadly, because the Nazis destroyed it in 1941. Most of its surviving inhabitants dispersed, and those were the people Sheraton sought out.


In The Bialy Eaters: The Story of a Bread and a Lost World, published in 2000, Sheraton takes readers along on a seven-year trek as she journeys the globe hoping to find and speak with emigres who once enjoyed the daily treat of this fragrant, poppy-seed and onion garnished roll. Ground zero for her quest? The diminutive bread's namesake of Bialystok, Poland.


I happened upon a copy of The Bialy Eaters at the library this summer and it intrigued me. My husband had asked me more than once to try making bialys at home and, not being too familiar with them, I thought the book might lend me insight. After reading it, I was hesitant to give them a try. Described as they were, with bittersweet emotion verging on reverence, I almost felt I'd  be trespassing on hallowed ground were I to attempt them.


But my husband didn't give up asking and, last Saturday, I finally set aside time to make a batch. Except for their somewhat disappointing shape after being baked--too fat and rounded with no flat crispy section in the middle--I was pleased with them. I would, though, like to try again, and next time I'll take steps to help ensure a more authentic shape. Not that they could ever really be authentic.


The consensus seems to be that the closest thing to the original bialy--though still not quite like the original--can be found at a bakery called Kossar's in New York City. If I'm ever in the Big Apple, I'd like to stop in and give a Kossar's bialy a try. Until then, I think I can make do with homemade. I'll just have to work on my technique.

About this recipe . . . 

I looked over a few contenders before settling on Jeffrey Hamelman's bialy recipe in one of my favorite cookbooks--Bread: A Baker's Book of Techniques and Recipes. I have never had anything but good luck with the formulas in this book, so I figured it was a good bet. I tweaked the onion filling, though. Hamelman's filling doesn't call for poppy seeds, nor does he advise readers to precook the onions at all. I think the inclusion of poppy seeds, particularly, lends something essential. I also added a smidgen of ground black pepper to the mixture.


Having made these once, I don't think the bialy dough-shaping directions are fully sufficient in Hamelman's book. (Sorry, Mr. Hamelman. I make this criticism with all due respect. Aside from this, I think your book is a real treasure, and I say that from the bottom of my bread-baking heart.) A novice bialy baker needs more detail in order to avoid having the bialys puff up, and close up, into little fat donut shapes. Not only that, the directions indicate that you should let the balls of dough proof on "1/4 inch of flour," but there is no explanation of why doing this is necessary. I was dying to know. I've read a couple of theories about it on the internet since last weekend, but don't you think a cookbook author should give such explanations up front? I do. Did I miss something? I desire enlightenment when I'm baking something new, not bewilderment, and that's especially true for me when we're talking about subtle details. Give me too much info versus not enough.


The verdict . . .

Overall, the taste and texture of these bialys was wonderfully satisfying. They're chewy on the outside without the leatheriness of bagels. They have that beautiful onion scent, and what about the yummy little crunch of the poppy seeds? Oh, man. Try one right out of the toaster and butter it while it's still warm, then bite into the crunchy crust. I predict you'll take the bialy, and leave the bagel behind.


Bialys

(For a printable version of this recipe, click here!)

This recipe makes one dozen bialys. I baked mine on a preheated, cornmeal dusted, baking stone set on the lowest rack of my oven.


5 and 1/8 cups of high gluten flour (That's about 1lb. and 6 oz.  I actually used 4 cups of high gluten flour, and 1 and 1/8 cups of bread flour because I was a little short on the high gluten. I have found high gluten flour for sale at Whole Foods Market; you can scoop your own there and buy just as much as you need.)

13 oz. water (slightly over 1 and 1/2 cups)

2 tsp. salt (I used kosher, and actually used 2 and 1/2 tsp.)

3/4 tsp. instant yeast (not active dry)


Onion and poppy seed filling:
1 medium yellow onion, finely chopped
2 Tbsp. fresh white bread crumbs
2 Tbsp. poppy seeds
ground black pepper to taste

To make the filling:
In a small pan, heat 2 Tbsp. of vegetable oil and saute the onions until softened but not translucent.
Dump the onions into a small bowl and stir together with the bread crumbs, poppy seeds, and pepper. Cover this and set it aside at room temperature for at least a couple of hours. 


To make the dough: 
In the large bowl of your mixer, with the dough hook attachment, place all of the ingredients for the dough. (You do not need to proof instant yeast. You can just toss it in there with everything else right at the start--pretty neat, huh?) Mix on the lowest speed for 3 minutes to combine. Continue mixing for about 5 or 6 more minutes; if your mixer will let you knead yeast dough on second speed, use it now. If you're confined to using first speed for all kneading (as I am with my 6 quart KitchenAid mixer, per their dire warnings regarding this kind of thing), that's okay too. 

The dough should be a dense springy mass when you're done, tacky but not sticky. (And, if you're into taking your dough's temperature, Hamelman says it should be about 76 degrees Fahrenheit at this point.)  

Put the dough in a bowl that's been sprayed with vegetable spray or lightly greased with vegetable shortening. Cover the bowl with plastic wrap and cover that with a dish towel. 


Let the dough rise at warm room temperature for two hours total, but one hour into the rising time, uncover it, put it on a floured surface and quickly give it a quick stretch and fold. It doesn't need any more than that at this point so don't overhandle. Put it back in the bowl, cover it again, and let it continue rising. 


Divide the risen dough into 3 oz. pieces (very helpful to have a food scale on hand for this, but if you don't have one just try to divide it evenly into 12 pieces). Round each piece tightly into a smooth ball, creating a surface tension. Seam side down, place the balls onto baking sheets that have been covered with 1/4 inch of flour. Then cover the balls lightly with plastic that's been sprayed or greased so it won't stick to the dough, and cover that with a dish towel. Let the dough proof fully (ie., have its final rise), on the sheets for 1 and 1/2 hours. 


Begin preheating your oven and baking stone at 480 degrees (yes, 480) at least half an hour before you'll need to bake. You want it to be completely hot when the dough goes in.


To shape the balls in preparation for baking, take each one in your hand and press both thumbs into its center, creating an indented hollow; don't make a hole through the dough. Rotate the ball of dough while turning it with your thumbs, stretching the middle so it ends up looking like a plate with a thick rounded rim. Make the bottom dough membrane a couple of inches wide, at least, and don't be shy about this. You want the bialy to bake up with a thin crisp middle section (do as I say, not as I did when I made these the first time!). 

Place the shaped pieces of dough onto your cornmeal-dusted baker's peel (the thing you'll use to slide them onto your baking stone, if you're using one). Fill each one with at least one rounded teaspoon (more if you prefer) of the onion filling. Spread a bit of it up the sides if you like, getting some of the poppy seeds on the doughy rim. 


Slide the filled dough pieces onto the preheated stone. Bake for 8 to 10 minutes. Look for bialys that are lighly golden, not overbaked or dried out. Take them out as soon as they're done, and enjoy!


(If you you'd like to comment on this post, or to read any existing comments, please click on the purple COMMENTS below!)

Sunday, May 30, 2010

Homemade Italian Bread . . . with Herb, Garlic, & Olive Oil Crust


I grew up in a household where bread, however abundant, was not typically served as an everyday accompaniment to dinner. Rolls were presented with special meals, but that was about it.


When I got married, though, my husband always liked having bread or rolls with his supper, so I got in the habit of including it on the evening menu. Of course, he doesn't like eating the insipid, tasteless, uniformly-sliced bread that comes from a plastic bag, so I've tried to supply good bread when I can, the kind that has at least a little more substance and flavor than the mass produced stuff. I usually buy a baguette or a nice loaf of Italian that might be on sale, but more and more lately I'm able to make something myself.


Anyway, I lucked out recently when I adapted a really basic recipe for Italian bread and tried it out on a new baking stone. It was alarmingly delicious, and fantastically golden. An unexpected home run, you might say. I think it's definitely worth sharing, so here it is!


About this recipe . . .

This formula assumes that you have a baking stone and a mixer with a dough hook, but if you don't, feel free to give this a whirl just using your hands for the mixing and kneading, and by using a baking sheet that's been covered with parchment, and the parchment dusted with cornmeal, instead of a baking stone.

Even with no baking stone, it's certainly worth a try, and I'll bet it will turn out fine. (If you do use a baking sheet, though, I'd recommend you put it on the middle rack of your oven; not the bottom rack as you would if you were using a baking stone.)

Italian Bread, with Herb & Olive Oil Crust


(For a printable version of this recipe, click here!)

1 and 1/2 tsp. instant yeast (or, if you can't find instant yeast, use 1 pkg. active dry yeast and proof it first in 1 cup of the warm water) 
3 cups warm water (between 105 and 115 degrees Fahrenheit)
1 Tbsp. kosher salt
2 cups bread flour
4 to 5 cups unbleached All-Purpose flour, plus more for the work surface
Cornmeal (about half a cup should be enough, or extra flour can be used if you don't have cornmeal)

To brush on top of the raw and baked loaves:
1/3 cup olive oil
1/2 tsp. dried oregano
1/2 tsp. dried basil
1/2 tsp. dried parsley
1/4 tsp. kosher salt
1 garlic clove, peeled and finely minced

In  a bowl with the 3 cups warm water, dissolve 1 Tbsp. kosher salt. Pour this into a large mixer bowl. 
Add the instant yeast, 2 cups of bread flour, and 3 cups of the AP flour into the bowl. Using the paddle attachment, mix on low speed for a couple of minutes to combine. 


Stop the mixer, scrape the bottom of the bowl with a spatula, and switch to the dough hook. On low speed, add in 1 to 2 more cups of AP flour gradually, about 1/2 a cup at a time. Keep mixing until a cohesive dough begins to form, about 4 minutes. (It will be relatively loose and still kind of wet at this point, but it shouldn't be as soft as a thick liquid, if that's any help!)


On a generously floured work surface, dump out the dough. For about 4 minutes, knead the dough firmly but gently by hand. It's okay to incorporate more flour as needed to keep it from sticking to your work surface at this point, but remember that this is meant to be a pretty soft dough. Once the dough is relatively smooth, place it into a large bowl that's been sprayed with vegetable spray, lightly oiled, or greased. Turn the dough over completely in the bowl, just once, so the bottom and top of the dough are both lightly coated. 


Lightly cover the top of the bowl with a piece of plastic wrap that's also been sprayed with vegetable oil, then cover the plastic loosely with a dish towel. Place the covered bowl in a warm place that's free from drafts. Let the dough rise until it's doubled in bulk. This will probably take at least an hour. 


Gently dump the doubled dough out onto a lightly floured board (don't use too much flour at this point if you can help it; just enough to prevent sticking) and knead it for 5 more minutes. 


Divide the dough into 2 equal parts with a bench scraper or a sharp knife and place both pieces, side by side, back into the sprayed bowl (spray again if you think it's needed). Turn the dough, as before, to make sure it's lightly coated. 

Cover the bowl again with sprayed plastic wrap and a dish towel, and let the dough rise again in a warm spot until doubled; this may take up to an hour. 


Gently dump the risen halves out onto a very, very lightly floured work surface and separate them. (The less extra flour you use now the better. Flour that gets incorporated into the dough at this point can leave ugly grayish streaks in the finished loaves.) One at a time, using your hands, shape each dough piece into a typical, Italian bread-style, oblong loaf. Gently lift and place each shaped loaf onto a completely flat wooden cutting board that's been heavily coated with cornmeal; this will function as your baker's peel. (Or, if you do have a baker's peel, use that.) 


The cornmeal is what allows the loaves to slide onto the baking stone. Don't place the loaves too close together! Cover the loaves, on the board/peel, with the sprayed plastic wrap and the dish towel. Let them rise one last time in a warm place, until almost doubled (about 30 minutes).


About 30 minutes before you'll be baking, put your baking stone on the bottom rack of your oven, and set the oven to 500 degrees to preheat (yes, I said 500; when the loaves have risen and you're finally ready to place them in the oven, you'll immediately turn it down to 375 degrees.)

In a small bowl, mix together the olive oil, dried herbs, minced garlic, and salt. Have a pastry brush ready.  


Once the loaves have risen, carefully score (aka slash) the tops with the edge of a sharp razor blade or a baker's lame (the lame is that little contraption pictured below, with the green handle; it's pronounced like the word "Tom"). 


This helps prevent the loaves from bursting haphazardly in the oven. Try not to score too deeply or you may deflate the loaves. Brush the loaves with the herb oil, but only use half of it because you'll need to brush them again a few minutes after they're baked. 


A couple of minutes before you're ready to slide the loaves onto the baking stone, take a spritz bottle of warm water and quickly open the oven door. Squirt the mist into the oven about six times; do not aim at the baking stone. Quickly shut the door. 


When you are actually ready to put the loaves onto the stone, open the door again, swiftly slide the loaves onto the stone with a quick jerk of the board/peel, and again squirt the warm water mist into the oven, above the loaves, about six times. Quickly shut the door, and immediately turn the temperature down to 375 degrees. Don't open the oven again for at least 15 minutes. 


The loaves are done when they are golden brown all over, and their internal temperature is about 200 to 210 degrees. Mine baked about 35 minutes, and I tested the interior with a stem thermometer that I poked into the side. 


After the loaves are done, place them on a cooling rack, and after a few minutes brush them again with the herb olive oil mixture. 


This coating will be absorbed into the warm crust quickly, and it really helps make the bread what it is. But if you'd prefer to skip this second coating, go ahead. In any case, enjoy!


Recipe full disclosure! I adapted this recipe from one that came with my Old Stone Oven Kitchen Supply brand baking stone. I changed the recipe by using part bread flour instead of all All Purpose flour, by using instant yeast vs. active dry yeast, by using kosher vs. regular salt, and by adding the olive oil and herbs component. I also completely rewrote the directions, adding in a lot of my own advice. 


If you'd like to comment on this post, or to read any existing comments, just click on the purple COMMENTS below!