Tuesday, August 23, 2011

Butterscotch Pudding with Butterscotch Almond Cookies . . . Like Love and Marriage!


Some things were born to cohabit. They were just meant to be together. Like Adam and Eve, like Ken and Barbie, these chewy butterscotch-almond cookies, partnered with homemade butterscotch pudding,  produce perfect harmony. I'm crazy about their complex flavor and just-right-to-bite texture.


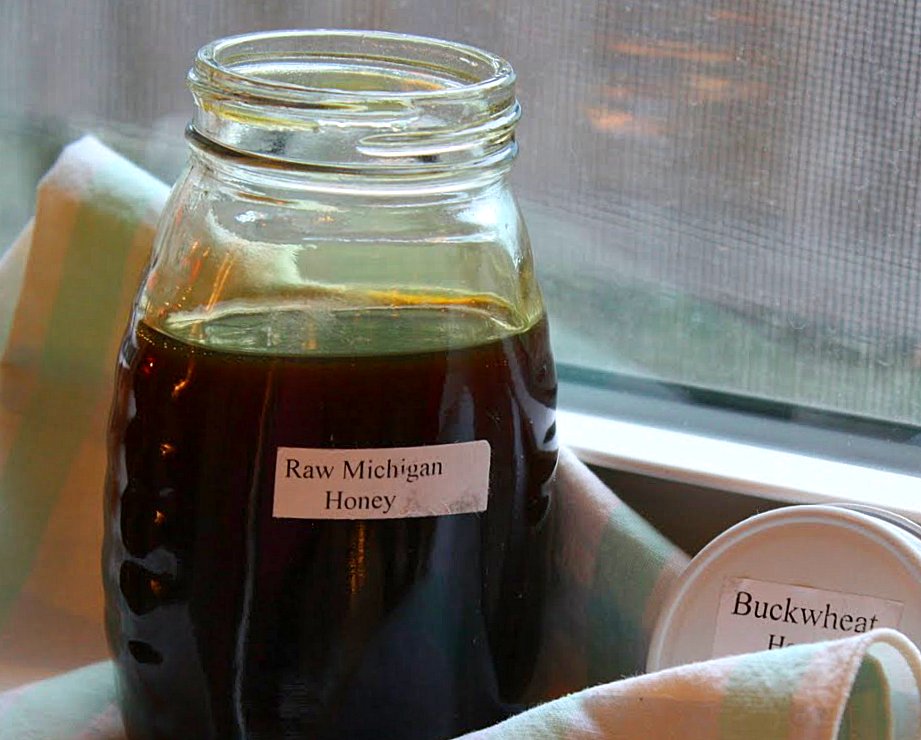
Along with light brown sugar, almond meal (finely ground blanched almonds), and almond extract, their secret ingredient is a couple tablespoons of buckwheat honey. I was lucky enough to stumble upon a beekeeper selling raw Michigan buckwheat honey at Detroit's Eastern Market a couple of weekends ago and naturally I wasted no time in nabbing a bottle. Dark and dusky, buckwheat honey is kind of like a cross between molasses and maple syrup, but more distinctive than either. Some people describe its color as seeming almost purplish when the light shines through it. A little dab added to baked goods will have your taste-testers munching slowly while staring off into space, muttering to themselves, ". . . what is that I taste? It's really good . . . "

About these recipes . . .

The cookie formula is one I adapted from When Everybody Ate at Schrafft's: Memories, Pictures, and Recipes from a Very Special Restaurant Empire.  Apparently, their homemade butterscotch cookies were a huge seller. Wish I'd been around when Schrafft's was in its heyday. I first heard about it as a kid, strictly through the old movies I watched on TV with my mom; seems like some character or other was always going there. "Meet me at Schrafft's," or, "Yeah, I discovered her sittin' on a stool in Schrafft's!" was a common refrain. This book is a hoot. I recommend it if you ever want to know more of the story.


I altered the recipe by using almond meal instead of the indicated finely chopped pecans, added in almond extract, used light vs. dark brown sugar, and threw in buckwheat honey as mentioned above. (And, yes, I reworded the recipe.)


The pudding comes from Luscious Creamy Desserts by Lori Longbotham. She suggests the addition of a tablespoon of Scotch whiskey to rile things up (her recipe is called "better-than-classic butterscotch pudding"). I put in half that amount just to see what might result. I thought the Scotch added an almost fruity aspect to the flavor and I was kind of on the fence about it, but my husband loved it.


In the pudding, I also used light brown sugar vs. dark brown and it was plenty sweet with the light brown. The pudding didn't firm up quite as much as I'd expected, but was similar in thickness to Greek yogurt. Just right, in any case, for dipping cookies. This pudding is very rich, and the recipe makes four modest individual servings. With a cookie on the side, this actually makes for a pretty filling dessert.


Butterscotch Pudding and Butterscotch Almond Cookies
(For a printable version of these recipes, click here!) 

Butterscotch pudding
Yield: Four 6 oz. servings

Have ready four 6 oz. ramekins/bowls standing by.
Have a medium-size bowl, along with a fine mesh sieve, standing by; it will be needed immediately after cooking the pudding.


1 and 1/2 cups whole milk
2 Tbsp. cornstarch
1/4 cup unsalted butter (4 Tbsp. or 1/2 of one stick)
1/2 cup packed light brown sugar
Yolks from 8 large eggs
1 pinch of kosher salt
1 tsp. fresh lemon juice
1/2 tsp. vanilla extract
1 and 1/2 tsp. Scotch whiskey (optional, of course!)

In a medium size bowl, whisk the cornstarch and milk until the cornstarch is well mixed in. Set aside.


Put the 8 egg yolks into their own medium size bowl with the pinch of salt nearby; set aside with a clean whisk.

In a large heavy-bottomed sauce pan over medium low heat, melt the butter.


Dump in the brown sugar and cook for about 2 to 3 minutes, until smooth and bubbly.


Whisking constantly, pour the milk-cornstarch mixture into the saucepan carefully, with the heat still on medium. Cook for about 2 minutes, continuing to whisk, until the liquid is hot and any sugar lumps are gone. Take the pan off the heat.


Add the salt into the bowl of egg yolks and whisk.


Into this, pour the heated mixture, whisking constantly (or you'll end up with scrambled eggs!).


Pour all of this back into the saucepan and put it back on the stove. Over medium-low heat, cook for 6 to 8 minutes, whisking continually all the while (isn't whisking fun?), until big bubbles show up on the surface.

Without delay (not even 20 seconds, people!), pour the entire mixture through the sieve you set up over the empty bowl. Into that, whisk the lemon juice, vanilla, and Scotch.


Let this cool for about 15 minutes, stirring periodically, then ladle it into your ramekins/bowls.


Cover each ramekin with a small piece of plastic wrap, pressing it right down onto the surface of the pudding to prevent a skin from forming. Cool further, until no longer hot, then refrigerate the puddings for at least three hours, until cold and set.

Butterscotch Almond Cookies
Yield: At least 24 good-sized cookies.

Preheat oven to 375 degrees. Line one or two baking sheets with parchment paper.

2 Tbsp. unsalted butter, at room temperature
3/4 cup solid vegetable shortening
1 cup light brown sugar
2 Tbsp. buckwheat honey (or use 1/4 cup extra brown sugar instead)

1 large egg
2 Tbsp. nonfat dry milk
1 Tbsp. vanilla extract
1 tsp. almond extract
1 and 3/4 cups all-purpose unbleached flour
1/2 tsp. baking soda
Generous 1/2 tsp. kosher salt
1 cup almond meal (Sometimes also referred to as almond flour; you can make your own by grinding blanched almonds in your food processor. Just be careful not to overgrind them into paste. I buy almond meal at Trader Joe's, where it's not too expensive, but you can also find it at health food stores and, increasingly, in regular grocery stores in the baking aisle.)

In the large bowl of your mixer, blend together the butter and shortening just for several seconds. Add in the sugar, beating until creamy. Add into this the egg, non-fat dry milk, vanilla extract, almond extract, and honey. Beat until light and fluffy.

In a separate bowl, whisk together the flour, baking soda, kosher salt, and almond meal. Pour this into the mixer bowl and blend on medium low speed.


Chill the dough for an hour or more before portioning onto cookie sheets.

Scoop the dough using a 1 and 1/2 Tbsp. portion scoop (or, just eyeball it, of course), leaving a couple inches of space between each one. Dampen your palm and gently flatten the balls down slightly. Bake the cookies for about 7 to 9 minutes, until lightly golden brown.


Cool the cookies for a few minutes on the baking sheet then move to a rack. Store them in an airtight container.


(If you'd like to comment on this post, or to read any existing comments, please click on the purple COMMENTS below!) 

Tuesday, August 9, 2011

Banana Cake-Bars with Dark Chocolate Chips (Still Lovin' that Spelt Flour!)


Given that I've been cozying up to the delicate sweetness of spelt flour lately, I thought it was high time to post another recipe that makes use of it. (My maiden voyage with spelt can be found here, in case you're interested.) Though spelt flour is made from the whole grain, it bears only slight resemblance, in my opinion, to whole wheat flour in terms of flavor and texture. I think it may be the golden ticket for home bakers who aren't completely thrilled at the idea of sweets containing any whole grain flour, yet who want to begin incorporating healthier flours into at least a few of their baked goods. It works really well mixed in with unbleached white flour, and I figure that's the best jumping off point. Give it a whirl on a small scale before you fully commit.


Bite into one of these treats and, from the texture angle, you won't even be able to tell that they're not made entirely with white flour. In fact, these banana cake-bars are so cakey I really couldn't get away with calling them just banana bars. These guys are more like soft little cake slices. With fragile golden crumbs that tumble off here and there when you pick them up, they cry out for clean white napkins and big tumblers of ice cold milk. They'll do those ripe bananas proud.


About this recipe . . .

I adapted this from King Arthur Flour Whole Grain Baking: Delicious Recipes Using Nutritious Whole Grains. This was the first whole grain baking book I ever really liked. I've baked from it many times, and most of the results have been surprisingly good. I've noticed that many of the older whole-grain baking cookbooks out there, from past decades, often include formulas for almost concrete-like breads, cookies, and cakes. I'm relieved we're finally seeing a lighter approach in volumes like this one, and in Good to the Grain, which has a whole chapter devoted to baking with spelt.

The original recipe called for semi-sweet chips but, honestly, I think that would have made them too sweet. Plus, I'm a maniac for dark chocolate so I used that instead. I also substituted canola oil for butter, I drastically reduced the amount of cinnamon and nutmeg and, as noted above, I used a mixture of white and spelt flour instead of using spelt alone.

My kids really liked these, which I must admit kind of surprised me. Nathan (the now-15-year old), who is always my willing guinea pig whenever I bake something new, adored them. I thought the boys would become uninterested the second they heard the word spelt come from my mouth, but it didn't phase them. In my house, that's a meaningful seal of approval.


Banana Cake-Bars 
with Dark Chocolate Chips (and Spelt Flour!)
(For a printable version of this recipe, click here!)

Yield: Makes one 9" x 13" pan; 24 - 2" squares.

Preheat oven to 350 degrees. Grease a 9" x 13" pan.
(Just fyi: I mixed this recipe entirely by hand. Gave my mixer the day off!) 


3/4 cup canola oil
1 and 1/4 cups light or dark brown sugar, packed (I used light.)
3 medium size bananas, very ripe, well mashed
1 Tbsp. lemon juice
1 tsp. vanilla extract
3/4 tsp. baking powder
3/4 tsp. coarse kosher salt
1 large pinch ground cinnamon
1 large pinch ground nutmeg
1 egg, large
1 cup spelt flour
3/4 cup unbleached all-purpose flour
1 and 1/2 cups dark chocolate, small chips or chopped bar chocolate (I used a combo of both.)


Stir the oil and the sugar together well in a large bowl. Beat in the bananas, lemon juice, and vanilla extract. Add in the egg, stirring vigorously. Stop to scrape the bowl with a spatula now and then.

In a separate bowl, whisk together the flours, baking powder, salt, and spices. Add to the liquid mixture and blend thoroughly. Pour the batter into the greased pan. Let the batter rest for 15 minutes (this direction allows the flour to absorb some of the moisture a thicken a bit). Sprinkle your chocolate evenly over the top. Bake for about 35 to 40 minutes, until a toothpick inserted in the middle comes out mostly clean. Cool the finished bars in their pan on a rack. They're best when allowed to rest overnight, in the pan, covered. (They stay fresh for at least two days and I actually thought the flavor had improved the second day.)


(If you'd like to comment on this post, or to read any existing comments, please click on the purple COMMENTS below!)

Friday, July 29, 2011

Fresh Sweet Cherry & Nectarine Upside-Down Cake . . . with Honey Whipped Cream


As a kid, the only upside-down cake I ever encountered was the classic pineapple ring and maraschino cherry model. I couldn't stand the stuff. As I recall, my dad adored it. He was the only one in the family who showed unfettered interest. Not even my mom, devoted dessert lover that she was, could bring herself to crave the canned-fruit laden cake. As a rule, it was atrociously sweet, sodden with that sugary syrup and just not an altogether great concept. She'd make it for him, of course, but the woman had her standards; given the choice, she would always have opted for a slice of something chocolate.


I guess it's no surprise, then, why I've never launched with abandon into the production of that sticky, inverted confection. Those pineapple cakes may be endearing in a retro sort of way, but not enough so to motivate me into actually baking one. No siree.


But this cherry and nectarine upside-down cake, on the other hand, while bearing some resemblance to that toothache-inspiring item of yesteryear, isn't as cloying. Made with thin slices of ripe nectarine, fresh sweet cherries, honey, plain yogurt, a hint of cinnamon and nutmeg, and a teeny tiny splash of peach schnapps thrown in to jazz things up, this baby's an improvement on that fusty old relic.


In fact, were the two cakes to pass on the street, I'd wager they'd acknowledge each other with a polite nod but, figuring they hadn't much in common, the pair wouldn't even stop to chat.

About this recipe . . .

Today's cake is adapted from a recipe in the gargantuan volume, Bon Appetit Desserts. It's a dream of a cookbook and, with 700+ pages, it's heavier than heck. Weighing in at 6.5 lbs., it's the size of a full-term newborn. They should sell it with a complementary stroller so readers can cart it around the house. Or, better yet, a forklift.


I customized the original recipe, which called for peaches along with a lot of spicy cardamom. What did I alter? In addition to using a combo of nectarines and cherries instead of peaches, I omitted the cardamom entirely, using just a little cinnamon and a scant pinch of nutmeg instead. I also added in a wee dab of peach schnapps, for a bit of zing, and I slightly increased the amount of salt (coarse kosher). Threw in the seeds of half a vanilla bean, and reduced the amount of granulated sugar in the cake by a small margin. In the honey whipped cream topping, I used less than half the amount of honey called for. (Have you ever mixed honey with heavy cream before? Fact is, you need a remarkably small amount to get the desired effect.)

With the adjustments, this cake is still sweet, but not ridiculously so. Some sweetness is just the nature of an upside-down cake. The flip-it-over-while-it's-still-really-hot concept wouldn't work without that gooey glaze permeating the top/bottom of the cake. In any case, if you want a concentrated sweetness infusion, an upside-down cake is definitely the ticket.

Fresh Sweet Cherry & Nectarine Upside-Down Cake 
with Honey Whipped Cream


(For a printable version of this recipe, click here!) 

Yield: One 9" one-layer cake

6 Tbsp. (3/4 stick) unsalted butter, room temperature (divided use)
1/4 honey (I used clover honey.)
1/4 cup light brown sugar, packed
1 and 1/4 cups unbleached all-purpose flour
Scant 1/2 tsp. ground cinnamon
1 pinch ground nutmeg
1/4 tsp. baking soda
Scant 1/2 tsp. coarse kosher salt
2/3 cup granulated sugar
1 egg, large
2 tsp. peach schnapps (optional)
seeds of half a vanilla bean (or, 1 tsp of vanilla extract)
1/2 cup plain whole-milk yogurt
2 medium size nectarines, pitted and thinly sliced in crescents (about 1/4" thick)
Approximately 16 fresh sweet cherries, pitted

For the honey whipped cream:
(Note: The original recipe suggested adding a little plain yogurt into this mixture. I didn't try that, but thought I'd mention it in case you'd like to give it a whirl!)
1 cup heavy cream, very cold
2 tsp. honey (Or use up to 2 Tbsp. if you want really sweet whipped cream.) 

Preheat oven to 350 degrees and place rack in middle of oven. Liberally butter the bottom and sides of a 9" round cake pan. (After buttering, I took the extra step of lightly spraying the pan with vegetable oil spray; as far as I'm concerned, one can't be too careful where inverted cakes are concerned.)

In a medium size sauce pan, melt 2 Tbsp. of the unsalted butter. Add into that the brown sugar and the honey. Cook on medium high heat until the mixture begins to boil; stirring often, let boil for about 2 minutes or until the mixture begins to darken just a bit.


Remove the pan from the heat and immediately pour all of it into the buttered pan. Set the pan aside; the syrup will harden in the pan while you're preparing the rest of the cake.


 In a small bowl, whisk together the flour, cinnamon, nutmeg, baking soda, and kosher salt. In the bowl of your mixer, using the paddle attachment on medium high speed, combine the remaining butter and the granulated sugar until it looks somewhat fluffy. Beat the egg into this on medium speed, along with the vanilla been seeds, and the peach schnapps.

Pour in half the flour mixture on medium speed just until well blended; blend in all of the yogurt. Add in the remaining flour on low speed, just until blended.


Arrange the nectarine slices (you may not need to use them all) in a spiral design around the edge of the cake pan, over the hardened syrup. Arrange the cherries similarly in the middle of the nectarine spiral. Using a spoon, gently dollop the soft batter over the fruit, being wary not to disrupt the design. Smooth the top of the batter carefully to completely cover all of the fruit.


Bake the cake in the preheated oven for 35 to 40 minutes, or until the cake is golden and the sides begin to pull away from the sides of the pan.


Let the finished cake cool for only 5 minutes after removing it from the oven. At that point, have your serving platter ready and place it snuggly over the top of the cake.


Quickly invert the hot cake pan onto the platter and delicately lift the hot pan off. If all goes well, you'll be faced with a lovely fruit design atop a glistening cake. Let the cake cool before slicing.

To make the honey whipped cream: 

Whip the cream in your mixer on medium speed in a chilled bowl. Drizzle the honey in and whip until the cream forms soft peaks. Add more honey to taste, if you'd prefer the whipped cream to be sweeter. Keep refrigerated and serve over individual slices of the cake.


(If you'd like to comment on this post, or to read any existing comments, please click on the purple COMMENTS below!)

Saturday, July 16, 2011

Chocolate Moosetracks Ice Cream with Mini Peanut Butter Cups . . . Heat Waves Have Their Benefits!


I have to believe that humans had a harder time enduring summer before the advent of ice cream. I mean, come on, how did those cavemen get along on the steamiest days with all that excess hair, no air conditioning, and--worse yet--no ice cream whatsoever?? It must have been hellish.


Yes, the present era may be heavily laden with its own problems, but historically speaking, I figure we're pretty darn lucky. For one thing, we have easy access to moose tracks. And I'm not talking about the kind of tracks imprinted in mud by a four-legged creature. No, I refer only to the endearingly frosty, alluringly creamy variety. The kind you can scoop up, press down into a brittle sugar cone, or plop generously into a big shiny bowl. I speak, my friends, of that singular ice cream that's swirled with fudgy streaks and dotted with mini peanut-butter cups.

It's one of womankind's favorite treats (and probably mankind's too). It's moose tracks ice cream, and it's a flavor concept that was, by the way, born and bred right here in Michigan. I guess it was only a matter of time before I had to take a stab at producing a homemade version.

Too much heaven, you say? Oh please. This is me you're talking to. We both know there's no such thing.


About this recipe . .

Everything valuable I know about making ice cream at home I owe to pastry chef David Lebovitz. I've probably already told you in the past that I never made really spectacular ice cream until he wandered along and published what I now view as nothing short of a seminal volume, The Perfect Scoop.  

Dear David, 
You've done civilization quite a service. 
Are you even remotely aware of that? Gosh, I hope so. 
Love, Jane.  
P.S.  I seriously think a copy of The Perfect Scoop should be placed in a time capsule at the North Pole, post haste. Just in case. 

I've lately been reading his memoir/cookbook, The Sweet Life in Paris, and in doing so have become ever more enamored of this down to earth, fun-loving pastry chef. He's got poetry in his soul, whimsy coming out of this ears, and by all accounts he's the kind of dedicated chef who tests and tests and retests again until he gets it right. What more can one ask?


Today's recipe is adapted from his formula for milk chocolate ice cream in The Perfect Scoop. I changed his base recipe very minimally, by deleting the 3/4 cup of cocoa nibs as well as the 2 tsp. of cognac. Instead, I used 2 tsp. of Kahlua (coffee flavored liqueur that goes fantastically well with chocolate), and I added a few swirls of homemade milk chocolate ganache into the just-churned ice cream before freezing it, along with a half cup or so of Trader Joe's mini PB chips (they're actually very good, not too sweet, and not waxy).  And, of course, I reworded the Lebovitz recipe to reflect exactly what I did 'cuz, well, that's just what I do.

Thus, I present you with my version of chocolate moosetracks . . . or as I imagine David Lebovitz might casually blurt out, in a cute French accent, "Voila le moose tracks du chocolat!"

(Oh, and before I forget, many thanks to Denali brand ice cream, for coming up with their original moose tracks flavor to begin with. You are a credit to our great mitten-shaped state!)


Milk-Chocolate Moose Tracks Ice Cream 
with Milk-Chocolate Ganache and Mini Peanut Butter Cups 

(For a printable version of this recipe, click here!)

8 oz. milk chocolate (with at least 30 percent cocoa solids), finely chopped (I used Trader Joe's brand milk chocolate; comes in a very big bar and has, I think, 33% cocoa solids. Not expensive, but nice  flavor. It's a good bargain to use for everyday baking, etc.) 

1 and 1/2 cups heavy cream
1 and 1/2 cups whole milk
3/4 cup granulated sugar (I use cane sugar when I make ice cream. Has better flavor, I feel, and they say it has fewer impurities than beet sugar.)
1 large pinch of salt (I used coarse kosher salt.)
4 large egg yolks
2 tsp. Kahlua (coffee flavored liqueur)
1/2 cup mini peanut butter cups (I used Trader Joe's brand for these, too. Yummy.)
1/2 cup milk-chocolate ganache, at room temperature (See separate recipe for ganache below.)

In a large metal bowl set atop a saucepan of simmering water, heat the chopped milk chocolate and the heavy cream. Stir gently, heating until the chocolate is completely melted. Remove the bowl from the saucepan, using care to get no water into the bowl. Set the bowl aside and place a clean mesh strainer close to it. 


Set up an ice bath by placing ice cubes and cold water in a large shallow bowl. This will be used to cool down your egg-based ice cream mixture before it goes in the fridge. Have the ice bath ready and waiting before you start the next steps.

In a medium size saucepan, warm up the whole milk, sugar, and salt. While they're warming, in a medium size bowl, whisk the egg yolks. Pour the warm milk mixture slowly into the yolks, whisking constantly. Then quickly scrape this mixture back into the saucepan with a flexible spatula.  Over medium heat, stir constantly, until it thickens and can coat the spatula or a wooden spoon. Be very careful not to over thicken this mixture. It should be very pourable; you don't want it to look like pudding at this point.


Pour the heated mixture quickly through the mesh sieve placed over the bowl of melted chocolate and cream. Urge it through with your spatula if needed. Stir to combine the two mixtures. Stir in the Kahlua. 


Place the combined ice cream mixture, in its bowl, atop the waiting ice bath, being careful not to let water get into the ice cream mixture. Stir the mixture now and then to help it cool. 


When it's at least room temperature, cover it with plastic wrap and refrigerate it for at least several hours or overnight. 


Make the milk chocolate ganache at least an hour or more before you plan to churn the ice cream in your ice cream maker. The ganache needs to be no cooler than room temperature so you can swirl it quickly and easily into your just-churned ice cream.


To make the milk chocolate ganache, and to finish making your ice cream: 


4 oz. milk chocolate, finely chopped (I used the same type of chocolate that I used for the ice cream mix.)
4 oz. heavy cream


Place the chopped chocolate in a small bowl. Heat the cream slowly in a small saucepan. When it's hot but not boiling, pour it over the chocolate. Let it sit undisturbed for a few minutes, then gently stir it until all of the chocolate has dissolved and the ganache is smooth and silky. Let the ganache cool uncovered until it reaches room temperature.


When you're ready to churn your ice cream, have on hand the ganache and the mini peanut butter cups. Churn the ice cream mix according to your ice cream maker's directions. As soon as it's done churning, quickly spoon in dabs of the ganache, swirling it in as you go, and sprinkling in the peanut butter cups as evenly as you can manage. Freeze your churned ice cream overnight so it can fully ripen. (I prefer to keep my churned ice cream in a couple of pint-sized sturdy glass containers that have tight lids because it seems to freeze more evenly and quickly than when I do it in metal or plastic.)


(If you'd like to comment on this post, or to read any existing comments, please click on the purple COMMENTS below!)


Monday, July 4, 2011

Spelt Scones with Dried Tropical Fruit . . . Taking Spelt for a Spin!


I wasn't sure just how I was going to feel about these scones, never having used spelt before, but I'm  pleased to report that they exceeded all of my expectations. Strange word, spelt. What the heck is it anyway? Sounds like something you'd find piled on the ground in a greenhouse, doesn't it? "Just dump that load of spelt over there, right next to the cedar mulch."


The first thing one tends to hear about spelt flour, it seems to me, is that it's an ancient grain dating back to the 5th millennium BC and, secondly, that it's quite nutritious. Made from the whole grain, spelt flour is uniquely mild and subtly sweet. It works well in recipes mixed with some white flour, and it doesn't add nearly the same heaviness as typical whole-grain wheat flour.


Spelt's flavor doesn't come on strong. If regular whole wheat flour struts up to your taste buds like a muddy paratrooper, spelt flour saunters up slowly, like a waiter in a white jacket who doesn't want to interrupt the conversation.


I actually made two slightly different batches of scones using this recipe. First, the wedge-shaped scones that are pictured with chopped, dried, tropical fruits (kiwi, mango, papaya, and pineapple; I didn't end up liking the taste of the dried star-fruit, so I left that one out).


And then, pictured below, I made a  softer dough (I added in a bit more cream) to make drop scones; for those I used only dried, sweet, Michigan (of course!) cherries. I brushed cream on the top of all the unbaked scones and sprinkled them with sanding sugar. Both varieties were very good. All of my males (that would be the hubby, the almost-15-year-old, and the 18-year-old) liked them a lot.


Like all scones--well, all the scones I've ever had the pleasure to meet--these are definitely best the first day, as they tend to dry out quickly. Second day, they benefit from being warmed before serving. Warmth revives them.


About this recipe . . .

From the 2010 book, Good to the Grain, by Kim Boyce, this recipe is one of many from that source I'd love to try. Cleverly organized by flour type, it recently won the James Beard Award in the baking and dessert book category. I changed the recipe slightly (it originally included only currants, and wasn't patted out and baked in wedges, among other things), and reworded it to reflect exactly what I did.


Spelt Scones with Dried Tropical Fruit (Kiwi, Mango, Papaya, and Pineapple)

(For a printable version of this recipe, click here!)

Yield: 8 or more good-sized pieces, formed either as wedges (cut pie-style) or as drop scones

1 and 1/4 cups spelt flour (I used Bob's Red Mill brand.) 
1 cup all-purpose flour, unbleached
1 tablespoon baking powder
2 Tbsp. granulated sugar (Doesn't sound like much, but the sugar on the dried fruit, along with the fruit itself, lends sweetness as well.) 
1/2 tsp. coarse kosher salt

2 oz. cold unsalted butter (1/2 of one stick), cut into 1/2" chunks
1/2 cup (Or add a little more if you like!) mixture of chopped, dried, tropical fruits (I used chopped, dried kiwi, mango, papaya, and pineapple; or, try sweet dried cherries instead.)
1 and 1/2 cups heavy cream, plus a couple extra tablespoons for brushing on the unbaked scones

Preheat oven to 400 degrees and line a baking sheet with parchment paper.

In a large bowl, sift together the first five ingredients, putting back into the bowl anything that didn't sift through (like, perhaps, some of the kosher salt).

Toss the cold butter chunks into the bowl, and begin pinching the butter into the dry mix with your fingertips. Keep doing this until it's the texture of fine cornmeal (Or, if you're squeamish, do this with a hand-held pastry blender, or even an old-fashioned potato masher. I've done it all three ways for scones, and it always works!) 


Pour in all of the dried fruit and stir it in evenly. Make a well in the center and, if you want your dough to be quite moist for drop scones pour in all of the cream.


If you want your dough to be slightly firmer in order to pat out a circle and make wedges, hold back 3 to 4 Tbsp. of the heavy cream.


Stir just until the dry mixture is more or less evenly moistened.

For drop scones, simply drop 8 large spoonfuls onto your parchment covered baking sheet, being sure to leave adequate space between each one. (No need to tidy up each "drop" but you certainly can if you wish. Might want to flour your fingers first.) For wedge scones, first dust a sheet of parchment lightly with flour. Plop the entire amount of thick, doughy batter onto the center of the parchment, and flour your hands well. Pat the dough into a circle about 10" in diameter.


Using a sharp pizza/pastry wheel (or a very sharp chef's knife) dipped first in flour, quickly cut the circle into 8 wedges, pie fashion.


Using a thin metal spatula if needed, gently lift each wedge and place it evenly on the parchment lined baking sheet.

Using a pastry brush, lightly brush heavy cream onto the tops of the scones and then sprinkle them with coarse/sanding sugar (granulated sugar will do fine as well, but the coarser sugars look more sparkly once baked). 


Bake the scones at 400 degrees for approximately 20 minutes or so, until the scones are golden on top and bottom.


Let them cool a few minutes on a rack before diving in. (Excellent served warm with butter--you heard it from me.) Best eaten the day they're made.


(If you'd like to comment on this post, or to read any existing comments, click on the purple COMMENTS below!)